This is the second card I made using this stamp. For the first one see Humorous Girl.
Note** When I posted this earlier, I forgot to mention I used sketch challenge #216 from CPS.
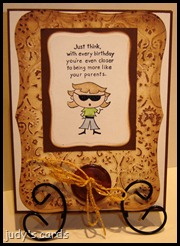
 If you didn’t see yesterday’s post, I was looking for a sentiment to use on another card, and ran across this stamp from the Inkadinkado set Humorous Birthday. A light bulb went off in my head, as this was a perfect sentiment for a birthday card I needed for this month (yesterday’s post). While making that card, I started wondering if it would have been better for her soon-to-be 19 year old daughter, so right then and there I decided to make another card using the same stamp for a July birthday card.
The main image was stamped on a piece of white cardstock with onyx black Versafine, then sponged with Distress inks. I had previously tried to do this image on glossy paper with Versamark and detail black ep, but I didn’t have a steady enough hand, the words were too hard to read…..it smeared a little, so I tossed it in the trash, only to get it out, color the image of the girl with an Alcohol Ink Refillable Pen (filled with Isopropyl Alcohol 91%) and some dried Alcohol Inks, I had poured out in a palette, then cut the image out and attached it to the sponged layer. The next layer is white, cut to size and the edges sponged with barn door Distress ink. The pink circle was cut and embossed with a Nesties circle die, then a white gel pen run around the inside of the die before removing. The next layer of white was just cut with a Nesties scalloped circle die and a black pen run around the inside before removing the die, the edges also sponged with barn door Distress ink. The background paper (white) was stamped with a SU background stamp chicken wire, inked up with an Adirondack Acrylic Paint Dabber (pitch black), then sponged with Distress Inks, layered on top of a piece of plain white with a pink base card. The sentiment is an unknown stamp, inked up with onyx black Versafine, stamped on white, then sponged with Distress Inks. I finished my little banner, by punching the ends with a square punch.
There is a video on the Ranger website for this coloring technique, only the pen is filled with blending solution.
Thanks for stopping by, and I love getting comments.
Happy Stamping!
judy
If you didn’t see yesterday’s post, I was looking for a sentiment to use on another card, and ran across this stamp from the Inkadinkado set Humorous Birthday. A light bulb went off in my head, as this was a perfect sentiment for a birthday card I needed for this month (yesterday’s post). While making that card, I started wondering if it would have been better for her soon-to-be 19 year old daughter, so right then and there I decided to make another card using the same stamp for a July birthday card.
The main image was stamped on a piece of white cardstock with onyx black Versafine, then sponged with Distress inks. I had previously tried to do this image on glossy paper with Versamark and detail black ep, but I didn’t have a steady enough hand, the words were too hard to read…..it smeared a little, so I tossed it in the trash, only to get it out, color the image of the girl with an Alcohol Ink Refillable Pen (filled with Isopropyl Alcohol 91%) and some dried Alcohol Inks, I had poured out in a palette, then cut the image out and attached it to the sponged layer. The next layer is white, cut to size and the edges sponged with barn door Distress ink. The pink circle was cut and embossed with a Nesties circle die, then a white gel pen run around the inside of the die before removing. The next layer of white was just cut with a Nesties scalloped circle die and a black pen run around the inside before removing the die, the edges also sponged with barn door Distress ink. The background paper (white) was stamped with a SU background stamp chicken wire, inked up with an Adirondack Acrylic Paint Dabber (pitch black), then sponged with Distress Inks, layered on top of a piece of plain white with a pink base card. The sentiment is an unknown stamp, inked up with onyx black Versafine, stamped on white, then sponged with Distress Inks. I finished my little banner, by punching the ends with a square punch.
There is a video on the Ranger website for this coloring technique, only the pen is filled with blending solution.
Thanks for stopping by, and I love getting comments.
Happy Stamping!
judy
While searching for a sentiment to use the other day, I ran across this stamp, after reading it, I knew right away who I would use it for, and it just so happens she has a birthday this month.
 The stamp is from an Inkadinkado set called Humorous Birthday, it was stamped on white cardstock with Onyx Black Versafine, colored with Prismacolored pencils & Goo Gone. I used a black glaze pen on the sunglasses, cut and embossed with a Nesties Label Eight die, then sponged around the edges with Vintage Photo Distress Ink. The next layer is just a piece of brown cardstock trimmed to size. The next layer is another new (to me) technique I tried from Beate John’s blog, called Acrylic Distress.
For this technique you will need cardstock, an embossing folder, acrylic paint dabber, sanding block, distress ink.
I cut a piece of white cardstock to fit a Cuttlebug embossing folder, (Textile), then ran the cardstock through the Cuttlebug. The entire piece was painted with an Adirondack Dabber (Snow Cap) Note: white on white is really hard to see, then I used a heat gun to make sure it was dry. Next I used a Tim Holtz sanding block, and ran it over the embossed areas, to take off some of the paint on the raised areas. Wipe the excess dust off the cardstock with a dry paper towel, then using a sponging tool, Vintage Photo Distress Ink was applied. On the video Beate uses a cotton rag, I used a paper towel spritzed with water and wiped the inked areas. The ink came right off of the painted areas, and left the white showing, the areas that were sanded stayed brown. It wasn’t dark enough to suit me, so I repeated the sanding and sponging. The second time around for wiping with a spritzed paper towel, I didn’t wipe as much off, as I liked this look. Next I cut and embossed with a larger Nesties Labels Eight die, then sponged the edges with Vintage Photo, The next layer is white cut to size, with a brown base card. The button is from the recipients Grandmother’s button bag, sewed on with, I guess you call it crochet thread…..I don’t crochet so I’m not sure, but I know this is the type stuff my Mother used to crochet doilies with. It’s a brownish color with a strand of gold metallic thread intertwined.
Tomorrow I will have another card using this same stamp, but a different design. While making this card, it occurred to me that perhaps the sentiment would fit her soon-to-be 19 year old daughter better, her birthday is in July. So what the heck, now I have another card instead of waiting until the last minute.
Thanks for looking and I love getting comments.
The stamp is from an Inkadinkado set called Humorous Birthday, it was stamped on white cardstock with Onyx Black Versafine, colored with Prismacolored pencils & Goo Gone. I used a black glaze pen on the sunglasses, cut and embossed with a Nesties Label Eight die, then sponged around the edges with Vintage Photo Distress Ink. The next layer is just a piece of brown cardstock trimmed to size. The next layer is another new (to me) technique I tried from Beate John’s blog, called Acrylic Distress.
For this technique you will need cardstock, an embossing folder, acrylic paint dabber, sanding block, distress ink.
I cut a piece of white cardstock to fit a Cuttlebug embossing folder, (Textile), then ran the cardstock through the Cuttlebug. The entire piece was painted with an Adirondack Dabber (Snow Cap) Note: white on white is really hard to see, then I used a heat gun to make sure it was dry. Next I used a Tim Holtz sanding block, and ran it over the embossed areas, to take off some of the paint on the raised areas. Wipe the excess dust off the cardstock with a dry paper towel, then using a sponging tool, Vintage Photo Distress Ink was applied. On the video Beate uses a cotton rag, I used a paper towel spritzed with water and wiped the inked areas. The ink came right off of the painted areas, and left the white showing, the areas that were sanded stayed brown. It wasn’t dark enough to suit me, so I repeated the sanding and sponging. The second time around for wiping with a spritzed paper towel, I didn’t wipe as much off, as I liked this look. Next I cut and embossed with a larger Nesties Labels Eight die, then sponged the edges with Vintage Photo, The next layer is white cut to size, with a brown base card. The button is from the recipients Grandmother’s button bag, sewed on with, I guess you call it crochet thread…..I don’t crochet so I’m not sure, but I know this is the type stuff my Mother used to crochet doilies with. It’s a brownish color with a strand of gold metallic thread intertwined.
Tomorrow I will have another card using this same stamp, but a different design. While making this card, it occurred to me that perhaps the sentiment would fit her soon-to-be 19 year old daughter better, her birthday is in July. So what the heck, now I have another card instead of waiting until the last minute.
Thanks for looking and I love getting comments.
Today’s card is another entry for challenge #94 at HM&F, and I can also enter it for challenge #6 at Use It Tuesday.
 When I checked out my House Mouse stamps for something I could use for this challenge, I ran across The Graduate stamp. I know the mouse isn’t moving in any way, shape or form, but to get somewhere today you must be well educated!! So I am taking that road (pun intended) for this card, I think that most graduates dream is to make something out of themselves, and an education is getting them there.
The Graduate was stamped with onyx black Versafine on white cardstock, colored with Prismacolored pencils & Goo Gone. I used a black glaze pen and a white gel pen for the eyes. For the tassel I used a Krylon 18 kt. gold leafing pen. Cut and embossed with a Nesties oval die, and before the die was removed stormy sky & peeled paint Distress Ink was sponged around the image, leaving the outer ring white.
I combined a couple of techniques for the building portion. I saw a video on the Ranger website about the alcohol ink fillable pen. I had thought about getting some of these before, but didn’t want to buy one for each color alcohol ink I have, and after seeing this video, I just had to have one. I used two palettes and put a couple drops of different colored ink in each well, to have an assortment to start out with, and let it dry. (I need more palettes to have all the colors I have handy.) I also read somewhere else, that you can use plain old alcohol the higher the percentage the better. So I filled my pen with Isopropyl Alcohol 91%. You have to use glossy paper, plain old cardstock does not work, I have not tried it on watercolor paper yet. I stamped the building image from the MFT set Going Places with Versamark and embossed with detail black ep. I tried stamping with some jet black Archival ink, that didn’t work, I didn’t bother with the onyx black Versafine, because that never wants to dry on glossy paper for me, I don’t like SU black because it looks purple instead of black, the only one that I had but didn’t try was jet black Stazon. Each building was colored with a different color alcohol ink.
The next technique I gave a try is the distressed glue technique from Beate John’s blog. When I watched this video, I thought it would be interesting to try it for clouds. I think with a little practice, it will be perfect. I used Aleene’s Quick Dry Tacky Glue, and dabbed the spots, then sort of smeared it a little with my finger, after it dried I sponged stormy sky Distress Ink over it, then wiped with a paper towel spritzed with a little water. The background paper is from a DCWV The Tradewinds matstack, sponged with vintage photo Distress Ink, layered onto white with the edges sponged with the vintage photo, and the base card is maroon. The sentiment is from the same MFT set, stamped on white with onyx black Versafine, and cut to fit the label frame. Two silver brads hold the label frame in place.
For the Use It Tuesday challenge, the MFT building stamp had never seen ink, and I had never used the label frames before, the dp is from a brand new stack, and I used two new (to me) techiniques.
Thanks for looking and I love reading your comments.
When I checked out my House Mouse stamps for something I could use for this challenge, I ran across The Graduate stamp. I know the mouse isn’t moving in any way, shape or form, but to get somewhere today you must be well educated!! So I am taking that road (pun intended) for this card, I think that most graduates dream is to make something out of themselves, and an education is getting them there.
The Graduate was stamped with onyx black Versafine on white cardstock, colored with Prismacolored pencils & Goo Gone. I used a black glaze pen and a white gel pen for the eyes. For the tassel I used a Krylon 18 kt. gold leafing pen. Cut and embossed with a Nesties oval die, and before the die was removed stormy sky & peeled paint Distress Ink was sponged around the image, leaving the outer ring white.
I combined a couple of techniques for the building portion. I saw a video on the Ranger website about the alcohol ink fillable pen. I had thought about getting some of these before, but didn’t want to buy one for each color alcohol ink I have, and after seeing this video, I just had to have one. I used two palettes and put a couple drops of different colored ink in each well, to have an assortment to start out with, and let it dry. (I need more palettes to have all the colors I have handy.) I also read somewhere else, that you can use plain old alcohol the higher the percentage the better. So I filled my pen with Isopropyl Alcohol 91%. You have to use glossy paper, plain old cardstock does not work, I have not tried it on watercolor paper yet. I stamped the building image from the MFT set Going Places with Versamark and embossed with detail black ep. I tried stamping with some jet black Archival ink, that didn’t work, I didn’t bother with the onyx black Versafine, because that never wants to dry on glossy paper for me, I don’t like SU black because it looks purple instead of black, the only one that I had but didn’t try was jet black Stazon. Each building was colored with a different color alcohol ink.
The next technique I gave a try is the distressed glue technique from Beate John’s blog. When I watched this video, I thought it would be interesting to try it for clouds. I think with a little practice, it will be perfect. I used Aleene’s Quick Dry Tacky Glue, and dabbed the spots, then sort of smeared it a little with my finger, after it dried I sponged stormy sky Distress Ink over it, then wiped with a paper towel spritzed with a little water. The background paper is from a DCWV The Tradewinds matstack, sponged with vintage photo Distress Ink, layered onto white with the edges sponged with the vintage photo, and the base card is maroon. The sentiment is from the same MFT set, stamped on white with onyx black Versafine, and cut to fit the label frame. Two silver brads hold the label frame in place.
For the Use It Tuesday challenge, the MFT building stamp had never seen ink, and I had never used the label frames before, the dp is from a brand new stack, and I used two new (to me) techiniques.
Thanks for looking and I love reading your comments.
Here is a card for Challenge #6 at Use It Tuesday, to use brads, eyelets, grommets, buttons, etc..
 When I found out what the challenge was, I thought of this stamp I bought years ago and have never used. I don’t know the company name, but the label says Ballet Dancing Doll 2003 limited edition, RS. I think I picked it up at A.C. Moore, but I’m not positive.
 Anyway, what made me think of this stamp is the movable arms & legs. The card doesn’t really look that great to me, I think I rushed through it too fast, trying too many different things at once, but I am pleased with parts of it.
I stamped the ballerina on white cardstock several times trying different things that didn’t work. Finally settling on onyx black Versafine. The skin and the blue parts were done with Prismacolored pencils & goo gone. For all of the yellow, green leaves, lips & fingernails, I used SU markers. While coloring the flowers in her hair, I thought of something I saw on the blog of Kittie Caracciolo. Of course I had to try it, I colored some scrap paper with the SU marker, then punched out holes with a 1/4” and 1/8” hole punch, glued the smaller hole in the center of the larger hole, and placed them on a mouse pad and pressed down with a dry embossing tool, then glued them in place over the stamped flowers. A dot of yellow stickles was added afterwards. For the smaller flowers, I grabbed my Crop-A-Dial and punched some more pieces.
Anyway, what made me think of this stamp is the movable arms & legs. The card doesn’t really look that great to me, I think I rushed through it too fast, trying too many different things at once, but I am pleased with parts of it.
I stamped the ballerina on white cardstock several times trying different things that didn’t work. Finally settling on onyx black Versafine. The skin and the blue parts were done with Prismacolored pencils & goo gone. For all of the yellow, green leaves, lips & fingernails, I used SU markers. While coloring the flowers in her hair, I thought of something I saw on the blog of Kittie Caracciolo. Of course I had to try it, I colored some scrap paper with the SU marker, then punched out holes with a 1/4” and 1/8” hole punch, glued the smaller hole in the center of the larger hole, and placed them on a mouse pad and pressed down with a dry embossing tool, then glued them in place over the stamped flowers. A dot of yellow stickles was added afterwards. For the smaller flowers, I grabbed my Crop-A-Dial and punched some more pieces.
 You would think the leg and arm on the right side of the stamp would go on the right and the same for the left side, well let me tell you, I have had these arms and legs off and on so many times, it’s a wonder I didn’t have to stamp them over, trying to figure out how they were supposed to be. The arms are attached with yellow brads, the legs with blue brads.
Can you tell I know absolutely nothing about ballet??
The yellow background is another something new (to me) I tried, Cuttlebug wax paper resist. Gina K has a video over at Stamp TV. Along with a sewing machine, my next item I avoid using is an iron. If I can’t wash & wear, I don’t buy, I learned that lesson a long time ago…..after melting something I was trying to iron. Anyway, I cut a piece of wax paper the size of a Cuttlebug folder, (Divine Swirls), ran it through the Cuttlebug, then placed it between two pieces of white cardstock, and ironed, next I sponged rusty hinge Distress Ink over it and wiped with a paper towel.
Having made it this far, I was at a loss at how to finish it, so I just winged it, I punched the left and right edges of the yellow with a MS punch around the page border punch (swirling lace). added a layer of white, using the same border punch, then sponged the edges with stormy sky Distress Ink. Next I have just a plain layer of black with a white base card. Next I added a punched black strip across the top. I didn’t think the four brads holding the body parts together was sufficient, so I cut another strip of black, and used the corner punch to the punch around the page set to make a tag, grabbed the Rubbernecker sentiment Flaunt It Text, stamped with Versamark, and embossed with detail white ep, added an orange mini brad to each side. Then using the Crop-A-Dial punched three holes for eyelets and added three orange eyelets.
The arms and legs are moveable, but can’t really show that in a picture, so here is another picture with them in a different position.
You would think the leg and arm on the right side of the stamp would go on the right and the same for the left side, well let me tell you, I have had these arms and legs off and on so many times, it’s a wonder I didn’t have to stamp them over, trying to figure out how they were supposed to be. The arms are attached with yellow brads, the legs with blue brads.
Can you tell I know absolutely nothing about ballet??
The yellow background is another something new (to me) I tried, Cuttlebug wax paper resist. Gina K has a video over at Stamp TV. Along with a sewing machine, my next item I avoid using is an iron. If I can’t wash & wear, I don’t buy, I learned that lesson a long time ago…..after melting something I was trying to iron. Anyway, I cut a piece of wax paper the size of a Cuttlebug folder, (Divine Swirls), ran it through the Cuttlebug, then placed it between two pieces of white cardstock, and ironed, next I sponged rusty hinge Distress Ink over it and wiped with a paper towel.
Having made it this far, I was at a loss at how to finish it, so I just winged it, I punched the left and right edges of the yellow with a MS punch around the page border punch (swirling lace). added a layer of white, using the same border punch, then sponged the edges with stormy sky Distress Ink. Next I have just a plain layer of black with a white base card. Next I added a punched black strip across the top. I didn’t think the four brads holding the body parts together was sufficient, so I cut another strip of black, and used the corner punch to the punch around the page set to make a tag, grabbed the Rubbernecker sentiment Flaunt It Text, stamped with Versamark, and embossed with detail white ep, added an orange mini brad to each side. Then using the Crop-A-Dial punched three holes for eyelets and added three orange eyelets.
The arms and legs are moveable, but can’t really show that in a picture, so here is another picture with them in a different position.
 Thanks for stopping by, and I love reading your comments.
I’m back in my stamping land. Nothing like waiting until the last minute to make a card is there? I have been having so much fun entering challenges, that I completely forgot about making Mother’s Day cards.
 When we left here last, we were supposed to go to my Mother’s for Easter, and come right back, but due to unseen circumstances, it took us longer than we expected to return. For Mother’s Day, (actually Saturday instead of Sunday) my DH will pick his Mother up at the nursing home and bring her down to our Log Home for the day. I will be staying down here, playing with my toys and cleaning for the get together on Saturday.
This is going to be my Mother’s Day card for this year. I will enter it in the HM&F #94 challenge, although I’m not really sure if it fits the challenge (This can be traveling, or going, or anything that gets you from one place to another.) Right now I wish somebody was carrying me around
When we left here last, we were supposed to go to my Mother’s for Easter, and come right back, but due to unseen circumstances, it took us longer than we expected to return. For Mother’s Day, (actually Saturday instead of Sunday) my DH will pick his Mother up at the nursing home and bring her down to our Log Home for the day. I will be staying down here, playing with my toys and cleaning for the get together on Saturday.
This is going to be my Mother’s Day card for this year. I will enter it in the HM&F #94 challenge, although I’m not really sure if it fits the challenge (This can be traveling, or going, or anything that gets you from one place to another.) Right now I wish somebody was carrying me around as I am very tired.
I chose the HMHH stamp Love Bunny for the main image, stamped on white cardstock with onyx black Versafine, and colored with Prismacolored pencils and Goo Gone. I used a SU black marker for the eyes on the adult bunny, and some black Inkssentials Enamel Accents for the eyes on the baby bunny. The tail on the baby bunny is a combination of Snow Writer and Polar White Flower Soft. The hearts were filled in with Xmas red Stickles. The main image was then cut and embossed with a Nesties circle die, and before removing the die, I sponged broken china Distress Ink around the image. The next layer (yellow) was just cut with a Nesties scalloped circle die, then I pierced each one of the scallops. The next layer is dp from a DCWV spring glitter stack, the corners punched with a ticket punch, then layered onto a piece of turquoise cardstock using a corner rounder punch, and layered onto a yellow base card. I attached yellow brads on the four punched corners. For the sentiment, I grabbed my trusty notebook with all my stamp examples in it to see what I wanted to use. I knew as soon as I spotted this Rubbernecker stamp called Some Bunny Text, it was perfect! I tried a new technique (to me) that I saw on Beate John's blog for wax paper resist. You just take a piece of wax paper, crumple it up and place it between two pieces of glossy cardstock, then iron. You can just use one piece of glossy cardstock, but by using two pieces of glossy cardstock you get two finished pieces to work with. You can not use photo paper for this technique, I tried it. After ironing the wax paper design, I sponged broken china Distress ink all over, then wiped with a paper towel, the ink does not stick to the wax, and comes right off. I stamped the sentiment with jet black Stazon, the glossy paper is slippery and very easy to smear, luckily I only smeared the “y’s” in Bunny a little, it was then cut and embossed with a Spellbinders fancy tag die, attached to the cardstock, and I slapped a flower brad on each side.
Thanks for stopping by, and I love reading your comments.
as I am very tired.
I chose the HMHH stamp Love Bunny for the main image, stamped on white cardstock with onyx black Versafine, and colored with Prismacolored pencils and Goo Gone. I used a SU black marker for the eyes on the adult bunny, and some black Inkssentials Enamel Accents for the eyes on the baby bunny. The tail on the baby bunny is a combination of Snow Writer and Polar White Flower Soft. The hearts were filled in with Xmas red Stickles. The main image was then cut and embossed with a Nesties circle die, and before removing the die, I sponged broken china Distress Ink around the image. The next layer (yellow) was just cut with a Nesties scalloped circle die, then I pierced each one of the scallops. The next layer is dp from a DCWV spring glitter stack, the corners punched with a ticket punch, then layered onto a piece of turquoise cardstock using a corner rounder punch, and layered onto a yellow base card. I attached yellow brads on the four punched corners. For the sentiment, I grabbed my trusty notebook with all my stamp examples in it to see what I wanted to use. I knew as soon as I spotted this Rubbernecker stamp called Some Bunny Text, it was perfect! I tried a new technique (to me) that I saw on Beate John's blog for wax paper resist. You just take a piece of wax paper, crumple it up and place it between two pieces of glossy cardstock, then iron. You can just use one piece of glossy cardstock, but by using two pieces of glossy cardstock you get two finished pieces to work with. You can not use photo paper for this technique, I tried it. After ironing the wax paper design, I sponged broken china Distress ink all over, then wiped with a paper towel, the ink does not stick to the wax, and comes right off. I stamped the sentiment with jet black Stazon, the glossy paper is slippery and very easy to smear, luckily I only smeared the “y’s” in Bunny a little, it was then cut and embossed with a Spellbinders fancy tag die, attached to the cardstock, and I slapped a flower brad on each side.
Thanks for stopping by, and I love reading your comments.


