Showing posts with label Stamp TV. Show all posts

Monday, May 2, 2011

Ballet Resist

Here is a card for Challenge #6 at Use It Tuesday, to use brads, eyelets, grommets, buttons, etc..

When I found out what the challenge was, I thought of this stamp I bought years ago and have never used. I don’t know the company name, but the label says Ballet Dancing Doll 2003 limited edition, RS. I think I picked it up at A.C. Moore, but I’m not positive.

Anyway, what made me think of this stamp is the movable arms & legs. The card doesn’t really look that great to me, I think I rushed through it too fast, trying too many different things at once, but I am pleased with parts of it.

I stamped the ballerina on white cardstock several times trying different things that didn’t work. Finally settling on onyx black Versafine. The skin and the blue parts were done with Prismacolored pencils & goo gone. For all of the yellow, green leaves, lips & fingernails, I used SU markers. While coloring the flowers in her hair, I thought of something I saw on the blog of Kittie Caracciolo. Of course I had to try it, I colored some scrap paper with the SU marker, then punched out holes with a 1/4” and 1/8” hole punch, glued the smaller hole in the center of the larger hole, and placed them on a mouse pad and pressed down with a dry embossing tool, then glued them in place over the stamped flowers. A dot of yellow stickles was added afterwards. For the smaller flowers, I grabbed my Crop-A-Dial and punched some more pieces.

You would think the leg and arm on the right side of the stamp would go on the right and the same for the left side, well let me tell you, I have had these arms and legs off and on so many times, it’s a wonder I didn’t have to stamp them over, trying to figure out how they were supposed to be. The arms are attached with yellow brads, the legs with blue brads.

Can you tell I know absolutely nothing about ballet??

The yellow background is another something new (to me) I tried, Cuttlebug wax paper resist. Gina K has a video over at Stamp TV. Along with a sewing machine, my next item I avoid using is an iron. If I can’t wash & wear, I don’t buy, I learned that lesson a long time ago…..after melting something I was trying to iron. Anyway, I cut a piece of wax paper the size of a Cuttlebug folder, (Divine Swirls), ran it through the Cuttlebug, then placed it between two pieces of white cardstock, and ironed, next I sponged rusty hinge Distress Ink over it and wiped with a paper towel.

Having made it this far, I was at a loss at how to finish it, so I just winged it, I punched the left and right edges of the yellow with a MS punch around the page border punch (swirling lace).  added a layer of white, using the same border punch, then sponged the edges with stormy sky Distress Ink. Next I have just a plain layer of black with a white base card. Next I added a punched black strip across the top. I didn’t think the four brads holding the body parts together was sufficient, so I cut another strip of black, and used the corner punch to the punch around the page set to make a tag, grabbed the Rubbernecker sentiment Flaunt It Text, stamped with Versamark, and embossed with detail white ep, added an orange mini brad to each side. Then using the Crop-A-Dial punched three holes for eyelets and added three orange eyelets.

The arms and legs are moveable, but can’t really show that in a picture, so here is another picture with them in a different position.

Thanks for stopping by, and I love reading your comments.

Wednesday, April 6, 2011

Farm Kisses


Today’s card is for the Stamp TV sketch challenge STVSKSP20.
clip_image002

I  chose the GKD set Funny Farm, stamped the farm scene on white paper with Onyx Black Versafine, then colored with SU markers. The image is layered on dark blue, the under layer of green was punched with a MS border punch, then I have a layer of dp from a DCWV Spring Matstack, again layered on green, with a dark blue base card. After attaching the layers, I used the SU mat pack template and pierced holes down both sides of the image and stitched with embroidery thread for cross-stitches. Added three red brads on the bottom left and the sentiment from the same set was stamped on white with Onyx Black Versafine, then punched with a SU word window punch.

Thanks for looking, I’d love to hear your comments.

Tuesday, April 5, 2011

Gone Hunting

Today’s project is another card for the brand new challenge at Paper Crafting with Creative Vision blog the theme is monochromatic.
clip_image001

I chose the Clear Vision stamp set Gone Hunting. With the three images I picked out, an old sketch I did at Stamp TV came to mind. Since camo paper isn’t exactly monochromatic, I went with some shades of green to match the dp I picked out from a DCWV Earth Coordinating matstack, that I have had for years. This is one of the very first pack of dp’s I ever purchased.

The images were stamped on a layer of solid green with Forest Moss Distress Ink, then trimmed with a paper cutter. The next layer is dp , a semi-leaf pattern, that I trimmed so much you can’t tell what the pattern is, layered on the same solid green, with a green plaid background, layered on the same solid green, with a darker green (matching the dark stripes in the plaid dp) card base. I distressed all the edges of the dp with a Tim Holtz distressing tool. The lace is Flexi Lace Hem Tape in a leaf color, with three matching green brads top right.

Now you are probably thinking…..why lace on this manly card? Well….it doesn’t have to be a manly card, I have been hunting going on thirty-nine years, and would love to get a card like this. I am very pleased with it (patting myself on the shoulder…..I hope I don’t break my arm). Just today my husband and I was out walking in the woods, looking for turkey sign and mushrooms, then we went trout fishing. The trout fishing was more like we took our poles for a walk, I didn’t catch a thing, he caught two, some of my fingers might be longer than the fish he caught, but it was great to have nice weather and to be out in the woods.

Thanks for stopping by, and I’d love to hear your comments.

Thursday, March 3, 2011

Bug Me

Today’s card is another entry for this week’s sketch challenge at Stamp TV.

It’s nothing special. When I finally sat down to work on it, I went brain dead. So I got my trusty notebook out with the copies of all my stamps and paged through it. I picked out a SU set, but kept looking, and spotted the Inkadinkado Patterned Bugs set, then when I turned a few pages the sentiment (Bug me anytime) from the CDS set Cute Quips jumped out at me. I thought about the dp I had used on another card recently and a card was born.

The picture does not show the colors correctly, no matter how I tried editing. The bug images were stamped on a light beige with Versamark, embossed with Joann Craft Essentials Pastel Pink and Ranger Evergreen ep, then run through the Cuttlebug with a stitched square ef, the stitches sponged with spiced marmalade distress ink, then layered onto a light blue punched square. The sentiment was stamped with Onyx Black Versafine, and the rest is the same as the other squares. The dp is from a DCWV Spring Stack, layered on the same light blue as the squares, then I stitched around the whole piece with the sewing machine. Cut a thin light blue strip, with the dp as a layer, put it in place and stitched all the way around it, then attached a strip of black ribbon, and placed the squares on top. The base card is orange.

I didn’t manage to get anything done yesterday, as we were off visiting. Today, for most of the day, I have been splitting, hauling and stacking firewood. My neighbor is moving, and wanted us to take the wood he had down at his house, I borrowed his log splitter this time, instead of splitting by hand. I got it all split, and hauled a good bit up and stacked it. It’s no wonder I went brain dead, I’m kind of tired. I might not be able to move tomorrow.

Thanks for stopping by, I’d love to hear your comments.

Tuesday, March 1, 2011

Farm Slides

Here is a card for this week’s sketch challenge at Stamp TV.

For my three squares I cut and embossed black cardstock with one of the Spellbinders Slide Mounts dies, and then I needed images to fit in the little areas. I finally settled on images from the GKD set Funny Farm, stamped the images on white cardstock, colored with prismacolored pencils and goo gone, went over the smiles and the sentiment with a glitter gel pen, then punched them out and attached to the slide mounts. The dp is from a DCWV Fall Stack, I cut the strip of polka dots off of the same paper, and sewed it on, attached the slide mounts and attached the layers to a cream colored base card. I also ran a sanding block over the raised areas of the slide mounts. This card turned out ok, I’m thinking I have made better, but then a lot of times I think that, and everybody else loves it.  

With the weather warming up, I will soon have to return to my other house L which means no stamping until I can get back down here. We have an outdoor furnace for heat, and I have been staying here keeping the fire going, and of course stamping. We’ve had a couple of beautiful warm days, I was outside cutting and stacking firewood for next year. I even managed to get some split with a wedge and sledge hammer, my wood splitter is up at the other house.

Hope you enjoyed your visit, thanks for stopping by, I would love to hear your comments.

Saturday, February 26, 2011

Pieced Farm

There’s a blog hop Animal Kingdom challenge going on at Stamp TV to use any of the listed GKD animal sets. I chose Funny Farm and here is my card.


There were quite a few sets you could use on the list. I only had two of those sets. I don’t know about everybody else, but sometimes I have ideas fly through my head so fast, I can’t keep up with them, it’s almost like a roulette wheel, going round and round, and when it stops that number (idea)  is what I use, all the other numbers (ideas) are forgotten. I should have a tape recorder, if they still make them, and just speak my ideas out loud, then I could remember more of them. While blog hopping tonight there was a lot of beautiful cards, I don’t think anybody paper pieced the set I used, but when that idea popped it stuck. I think this is a first for me, when I paper piece, it is normal looking, that is also why I chose the sentiment Funny Farm from the same set. I started digging through my scrap pile to find some pieces with small print, I just made different card not long ago, using this sketch, and the same white, blue, dp (except for the pig), tag, and the ribbon for the Clearly Inspired Challenge sponsored by Clear Dollar Stamps. I really liked the way the colors went together. So rather than sitting half the night trying to decide what to do, I went with that.

The animals were stamped first with versamark, embossed with detail black ep, I used a white gel pen to fade out the dp colors around the eyes, the flowers and the spots on the cow, then I colored over some of those spots with different glaze pens. After all why would a cow have white spots, when it is purple with green designs anyway. The animals were laid to the side, while working on the rest of the card. Next I used a 4” square of purple, my MS fence border punch and my newly discovered technique of how to punch around a square using only a border punch. You can find my redneck tutorial here. I cut a square of blue instead of green for the grass, stamped some grass from a CDS set called Mini Silhouette Scapes with Dusty Concord distress ink. Then I proceeded to cut the background pieces. The darker of the two dp’s is a whole layer, the lighter of the two are cut and layered on white and placed on the two corners of the darker dp, this was attached to a layer of the same blue used for tag and square. I cut out the blue tag with a cuttlebug slider die, stamped with versamark, embossed with detail white ep, ran the ribbon through the tag and across the layers of dp to the back of the blue layer. The animals were attached to the blue square, which was attached to the fence square, and put in place over the ribbon/dp layers. The base card is white. I had to use more of the dp than was in my scrap pile, (except for the pig) the dp is from a DCWV Summer Dream matstack.

I don’t know what they are smoking on this farm, but I hope you enjoyed it. Thanks for stopping by, and I’d love to hear your comments.  

Aerobics Suck!

This week’s color challenge at Stamp TV is to use crème de menthe, red hot and lemon drop. Here is an entry.

I chose to use two of my Rubbernecker Stamps, Aerobics Suck! and Ethel in Leotard. The main image was stamped on white cardstock with onyx black versafine, colored with prismacolored pencils & goo gone, cut out, then I decided to give her varicose veins, (hope you can see them in the picture), and her glasses have a coating of All Night Media Liquid Embossing Sepia Glass Finish, so she was laid to the side to dry. The layer under her is a piece of yellow matching the cardbase, it was run through the Cuttlebug with the Perfectly Paisley ef, then cut and embossed with Nestie Labels Thirteen, and sponged with some distress inks (Tumbled Glass & Fired Brick). The artificial crème de menthe layer was also cut and embossed with the Nesties. The red layer was also run through the Cuttlebug with an ef from the Heritage Collection, the corners sponged with Fired Brick. The sentiment was stamped on artificial crème de menthe with onyx black versafine, then cut out with a Ribbon Tag Trio die, I used another die from that set and cut out a layer of yellow to put behind it. The yellow ribbon was run through the tags and attached to the back of the red layer. The lady was added with foam pop-dots.

Thanks for looking, and I’d love to hear your comments.

Thursday, February 24, 2011

Cattail Birthday

Today’s card is for this week’s sketch challenge at Stamp TV, there is no shimmer, no glimmer, no razzle-dazzle, just a simple card following the sketch, with a little sewing.


This is my fourth attempt at using my Singer Pixie Plus sewing machine on a card. I must be getting better at this, the thread didn’t get tangled up, it only skipped one stitch,  and thank goodness that darn needle didn’t come unthreaded again.  Well, they say practice makes perfect………..I need a lot of practice!!

For this card I chose papers to match the thread that was on the sewing machine, so I wouldn’t have to go to all the trouble of changing it.  The base card is a rust (matching the thread) , next is a layer of dark brown, then a piece of plaid dp that came from a DCWV Fall Stack, with the matching rust color in it. I stamped the cattails from a GKD set called Life is Good by Theresa Momber using SU markers to color the stamp (chocolate chip, always artichoke and bordering blue) on white cardstock, cut down to size and layered on dark brown, attached them to the other layers, minus the base card and ran the sewing machine around each. Happy Birthday is also from a GKD set called Purrr-fectly Delightful by Theresa Momber colored with another SU marker (really rust) and stamped on white cardstock, then cut and embossed with a ribbon tag trio die, the ribbon was run through it and attached to the back of the layers, then they were added to the base card.

Thanks for stopping by and I ‘d love to hear your comments.

Monday, February 21, 2011

Bad Hunter

For this week’s sketch challenge STVSKSP14 at Stamp TV. I searched through all of my stamps to come up with something for this challenge. Instead of using three different image stamps, I chose to use just one after I ran across the sentiment which says Vegetarian: An old Indian word for Bad Hunter.


Usually, I’m just making cards for challenges, and later if I need one in a pinch, I’ll grab one of these. Today was different, when I thought of this image and sentiment, I knew right away, this was going to be a birthday card for one of our friends, just don’t want him to get mad. You guessed it, he came home empty handed during our deer seasons. I say seasons because we have several different seasons……there is early muzzleloader which lasted a week or two, rifle season was in for two weeks, the regular muzzleloader season another two weeks, and then rifle season comes back in for a couple more days. We also have a bow season, but I’m not counting that, he didn’t go out with his bow.

For this card I chose a deer image, one of the first individual stamps I ever bought, it’s been a few years ago, but I think I got it at A.C. Moore, it doesn't have a company name on it. I stamped it with saddle brown stazon ink on white cardstock, layered it on dark brown. Then I started working from the other direction, my base card is white, then I have a layer of the same dark brown I layered the deer with, and a layer of dp from a DCWV The Fall Stack. After assembling these I was able to put the deer images into place. The sentiment was a problem, it was too long for the spellbinders dies, and the cuttlebug label dies I have were way to big to fit. So I tried a MS corner punch out on a scrap piece of paper, and it worked just fine. I did not line the paper up like cutting a corner, I placed it straight in until the end of the longest point wouldn’t be cut off. My paper was about 1” wide.  The Vegetarian stamp was purchased from The Rubber Stamp Shack back in 2008. The sentiment was stamped on the paper with saddle brown stazon, then I cut the other end with the punch. Attached the sentiment, and added four brown brads.  After all the layers were attached, but before placing them on the base card, I started paper piercing, around the deer images and the sentiment.

Thanks for looking and I look forward to any comments you may leave.

Funny Friend

This card is for the release party challenge #3 Sketch for you. I chose the GKD set Funny Farm for my main image and sentiment.


I stamped the main image on a piece of brown mustard colored paper, and on white with onyx black versafine, I had the intention of coloring the white. The mustard colored paper was then cut and embossed with a nestie circle. On the piece of white that was stamped, I wound up just coloring the head, hair and hat, with prismacolored pencils & goo gone, then decided to stamp the overhauls on the striped dp and cut out, I stamped it again on the dp, with the stripes going in a different direction and cut the pocket out. I was going to leave the shirt the mustard color, but changed my mind on that too, so the shirt was stamped on the pale yellow, cut out and attached. That left the boots and the sign. So I stamped the boots on the pale yellow, cut them out, then attached. For the sign I stamped the sentiment in onyx black versafine on the white piece I had previously stamped the main image on, then cut out and attached. All of the dp is from the DCWV Flower Shower Spring Matstack. The base card and the layered circle is a pale yellow, everything else was layered with the brown mustard color. I grabbed some pale yellow adhesive backed ribbon I have had for a while, picked it up at Joann’s on the clearance rack. Pierced three holes on the bottom right for pale orange brads and picked out three flowers from a Paper Flower embellishment jar by Portafolia that I had picked up at a yard sale, pierced holes and attached the flowers with yellow brads. I also added some color with a prismacolored pencil under the girls feet, a flower brad for the hat, googly eyes, and a final touch was to add crystal lacquer on the boots.

Thanks for looking and I would love to hear your comments.   

Sunday, February 20, 2011

Kitten Thread

This card is for Theresa’s string it up release party challenge at Stamp TV. I chose the GKD set Purrr-fectly Delightful by Theresa Momber.


The main image was stamped on black cardstock with versamark and embossed using detail white ep. Instead of having a black cat with a white outline, I colored over the white with a dark gray prismacolored pencil, added some pink for nose, ears and paw, filled in the eyes with a white gel pen, used a green glaze pen over top of the white, then added a dot over the green with the white gel pen, and cut the kitten out. The blue layer was cut and embossed with a nesties rectangle die, then the white layer was cut with a scalloped rectangle nestie die. I had the idea of the kitten playing with a ball of thread, and just had to figure out how to do it. I punched a small circle then wrapped some of the gold metallic thread around it, and from there wrapped it around the two layers the kitten  is attached to. Those layers were added to the plaid dp from my scrap pile. Since the plaid paper was very thin, I mounted it to a piece of white the exact same size, so that it doesn’t show, but gives it some thickness, punched the corners with (I’m sorry, but I don’t remember the name of that punch), and wrapped gold metallic thread around the edges, and mounted onto a layer of white, then the base card is the same blue as the kitten is mounted on. For the sentiment, I used one from the same stamp set, stamped with onyx black versafine, and cut out with a spellbinders ribbon tag trio die, in place of ribbon, I again used the gold metallic thread to attach the sentiment to the card.

Thanks for looking and I would love to hear any of your comments.

Saturday, February 19, 2011

Funny Farm

Here is a card for Giovana’s release party color challenge at Stamp TV. I chose the GKD stamp set Funny Farm for the main image and sentiment.


The main image was stamped on white cardstock with onyx black versafine, then I paper pieced the barn, silo roof, tree tops and the striped field. I made a mask and stippled spun sugar,tumbled glass, and broken china for the sky, peeled paint and shabby shutters for the other two fields. It seemed a little bare, so I pulled out my CDS set Mini Silhouette Scapes and added the birds, and plants in the fields. This scene is layered on white. Next I chose some dp from a matstack I have lost the cover for, but I’m sure it’s DCWV. For a while I thought I had picked out yellow with white polka dots, must have strained my eyes cutting out those little things, turns out it’s yellow with white stars, oh well, it is also layered on white, with a green card base. The sentiment was stamped with onyx black versafine, after cutting out the yellow and green pieces with cuttlebug slider dies. I ran the ribbon through both and attached with a foam dot, pierced a hole on each corner of the main image and stuck four yellow brads in the holes. Thanks for looking and I’d love to hear your comments.

Wednesday, February 16, 2011

Sheep Herd

Here is another card for this week’s sketch challenge over at Stamp TV. I chose the GKD stamp set Funny Farm, for the main image and sentiment.

The black sheep was stamped with versamark on black cardstock, embossed with detail white ep, then cut out, and googly eyes added. The white sheep were stamped on white cardstock with versamark, embossed with detail black ep, then cut out. The green with white polka dot dp from DCWV Nana’s Nursery Stack, was cut and embossed with a nestie oval, and before the die was removed, I ran a black ink pen around the inside of the die. The white layer behind was cut with a nestie scallop oval, and the dots were made with a black ink pen. The next dp, from a My Mind’s Eye Home Photo Mat Blue stack, was cut to size and the corners punched with a ticket punch. The next layer is white, cut to size, and the corners punched with a corner rounder punch. The base card is green. The sentiment was stamped in versamark on black cardstock, then cut and embossed with a nestie circle die, before the die was removed I ran a white gel pen around the inside of the die. I placed four green dew drops on the four rounded corners of white. They may not be dew drops, I bought them at a yard sale and they weren’t in the original containers. Thanks for looking and I’d love to hear your comments.

Tuesday, February 15, 2011

Chalkboard Trees

Today’s card is for this weeks sketch challenge over at Stamp TV. I chose a stamp from the GKD set Life is Good by Theresa Momber for the main image, and decided to try the chalkboard technique.

The image was stamped on black cardstock with craft white ink, then pounced with different color chalks to color the image, the trees and ground are two different colors of green, the water blue, the rocks silver, background of trees white, you can hardly tell the difference of colors in the picture but in real life you can. I used Pebbles Pearlescent chalks the Shimmer collection. I sprayed hairspray on it to hold the chalk in place, then cut it out and embossed it with a nestie oval die. The next layer is just white cardstock cut with a nestie scalloped oval die. The next layer is some, what I call twinkling stars dp from my scrap pile. As an added extra I punched white cardstock with the ek success moon & stars punch, added a little versamark and some of the white shimmer chalk (it doesn’t show up in the picture). The layer behind the dp was white, but I sponged it with chipped sapphire distress ink, the base card is white. The sentiment is from the GKD set Funny Farm, stamped on black cardstock with craft white ink and chalked with the white shimmer chalk, punched with a round punch, and layered on white also punched. Thanks for taking a peak, and I’d love to hear your comments.  

Sunday, February 13, 2011

Alcohol Faux Bleach

I was reading a tutorial by Sherry Cheever over at SCS today on alcohol faux bleach, I also watched the video. I picked out colors I thought would match the color challenge at Stamp TV for this week, to try it out. Seems like I can’t go make a card anymore without using a color challenge or sketch challenge, whether it’s past or present, but for me that is better, as I used to case a lot of work, now it’s my own ideas making the sketches and color challenges work.

For today’s card I chose the flowers (again) in the GKD set Purrr-fectly Delightful by Theresa Momber. For this technique you are supposed to use glossy cardstock, stamp an image and emboss with clear ep. Dab your alcohol inks all over the paper and blend, the embossed image will be covered with color. Then you put a paper towel down to keep the paper from moving around, lay another piece of cardstock over top of the embossed glossy, use a craft iron on top (Sherry used a craft iron set on high, my craft iron doesn’t have any settings so I didn’t know if it would even work), the embossing comes off onto the blank cardstock, so that you have two images  (one with the alcohol inks and a plain one with the colored embossed image. I like to hoard my glossy cardstock, so I tried it out on some cheap photo paper I picked up at the Dollar Tree. First I cut the cheap photo paper and the extra piece of white paper the same size, I figured it would make it easier to work with. I stamped with versamark and embossed with detail clear ep. This works as long as you do not overheat it. You can tell when it starts overheating, as bubbles in the paper start appearing, so I quickly removed the heat gun, and the bubbles disappeared. I used caramel, butterscotch, denim and stonewashed alcohol inks, and the alcohol blending solution, applied with the alcohol ink applicator and felt to make the background colors. Then I laid the inked up image on a paper towel face up, and placed my other piece of white paper over top of the inked up paper. For this paper I did not use my good white cardstock either, I used some other paper that I don’t mind wasting, plus it isn’t as thick as the regular cardstock, I thought the iron might work better. I placed the iron on top of the two layers and ironed until the embossed image attached itself to the plain white paper. The image on the card is the cheap photo paper with alcohol inks, I threw my plain white piece in the trash, the embossed image was on it like it was supposed to be, but I also had some color spots on it too. The paper I was using, had a very slight gloss to it, and that may be what the problem was. I layered the alcohol inked up paper on white, then blue. I then poked holes right at the edge of the vase on both side and ran a piece of yellow hemp twine through. I cut a little tag out with a cuttlebug tiny tag die and stamped feel better on it in versamark, embossed with detail white ep, placed a yellow eyelet in the hole, and ran the twine through it and tied a bow, but decided I didn’t like it, so I left the card with no sentiment, and just tied the bow. Next it was added to the yellowish colored base card. Thanks for stopping by and I’d love to hear your comments.

Framed Train

The other cards I have been making since discovering how to punch around a square with just a border punch and no corner punch (see my redneck tutorial) have started with 3” squares. I decided to give a bigger square a try, this time I started with a 4” square, and gave another border punch a chance to shine. I wasn’t even sure if the train border punch would work at all, but it worked like a charm. I paid very careful attention to where I started punching on the two corners with the engines. You can’t use real heavy paper either, the punch would probably break trying to go through two layers at once, my punch has jammed up a couple times with what I am using. Anyways, I had a train frame to use, so I created a card for the Stamp TV color challenge. This week’s color challenge is to use moonlit fog, sweet mango and white, since I don’t have any GinaK paper I have to substitute, so I try very hard to get the colors as close as possible with what I have.

An idea started forming in my pea brain,  a train in the dark, with the sun coming up (I guess the train wouldn’t be white if it was in the dark now would it?) So I used the GKD set Life is Good by Theresa Momber. First I stamped the train on white cardstock with versamark and embossed with detail black ep, then cut it out. For the next layer, I cut a square of white, made a mask and stippled wild honey for the sun, the sky and mountains are a combination of stippling and sponging stormy sky and weathered wood. (I really need to work on my background sponging.) The next layer is blue the same as the base card, then I have my white train frame square over a layer of yellow. The sentiment is from the same stamp set stamped in stormy sky distress ink on a piece of white punched with a SU punch. My idea to begin with, was to have the sun corner at the top in the middle, but duh!… my train frame was too wide for the card, so I had to tilt it. Oh well, it looks ok. I’m just so tickled with myself for figuring out how to do the frame thing, the rest is no big deal. Thanks for stopping by and please feel free to leave me a comment, I’d love to hear what you think.

Saturday, February 12, 2011

Redneck Tutorial - Critter Frame

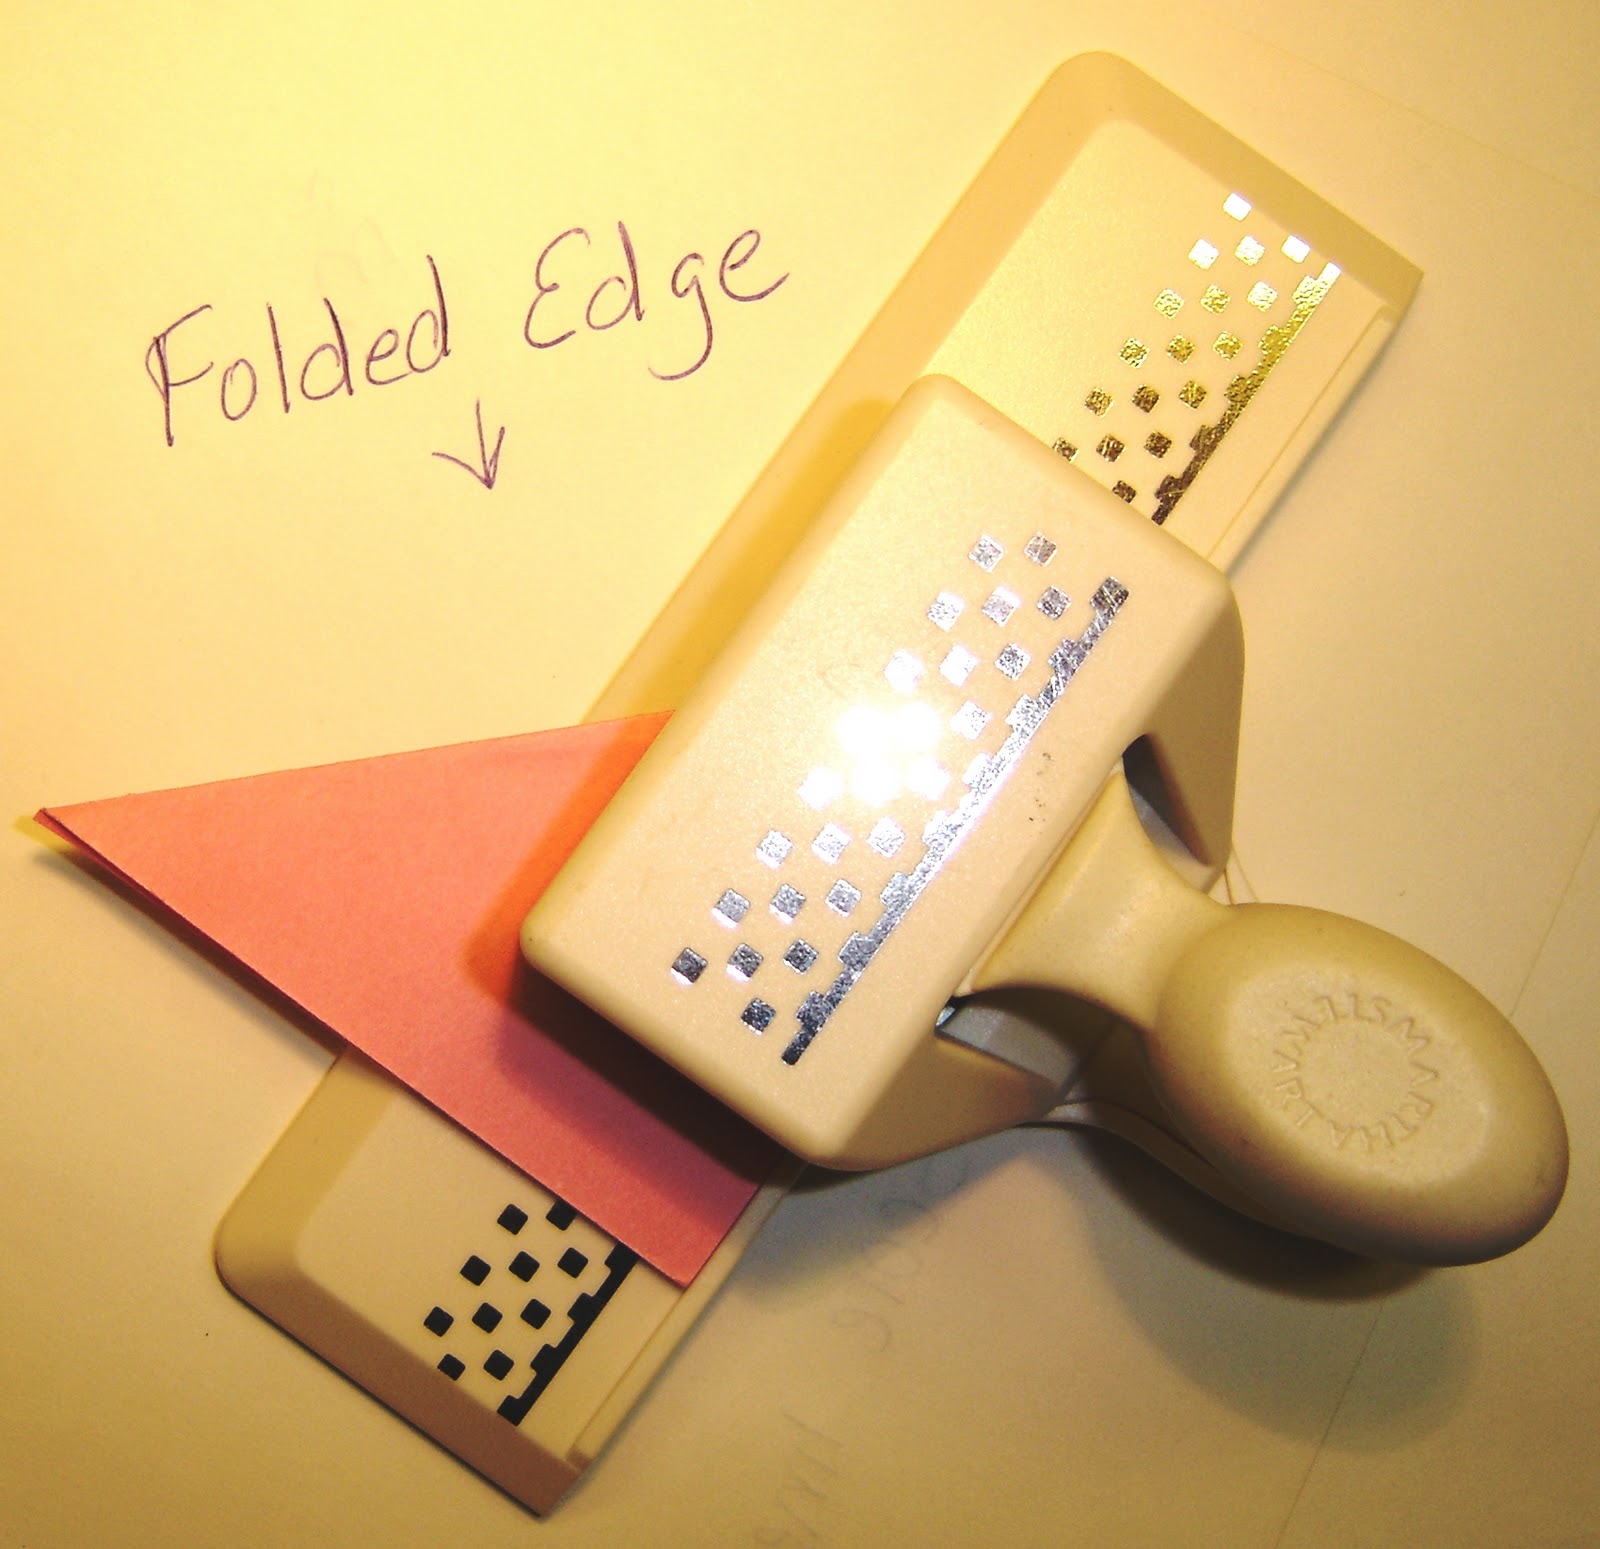
I was sitting here today, watching some videos on how to do different techniques over at Paper Craft Planet, wondering why I couldn’t think up something. I guess I’m just a day late and a dollar short! Well, I went back to my craft room to try and make a frame with a border punch, like in one of the videos. Mine didn't turn out right, but, while I was sitting there trying it out, the thought occurred to me about taking a square piece of paper and folding it in half diagonally, so I tried it. I’m not sure, but I don’t think anyone has done this yet, to use a border punch and punch all the way around a square without using a corner punch. I definitely was not ready to make a tutorial, but I gave it a try, you can just call this a redneck tutorial J.

Step 1 – I cut a piece of paper 3” x 3”. (I had already done step 2 before I took this picture)

Step 2 – Fold and score diagonally.

Step 3 – Place in border punch, with scored fold away from punch, I looked at the bottom of the punch and lined the point over at the far edge and punched. (Heavy weight cardstock may not work doubled in the punch.)
Step 4 – Turn the piece around and punch other side the same way.

Step 5 – Fold and line up holes in opposite diagonal direction, you can  score it, but the holes may not line up. Lineup holes with the diagram on the edge of the punch, making sure it is far enough into the punch to complete the row.
(I forgot to take a picture)
Step 6 – Turn the piece around and punch other side the same way.

Step 7 – Completed frame.

**Make both folds in the same direction, place the scored side away from you, the folds don’t show up so bad.**

Since I invented something, (at least I think I did) I wanted to show it off in a card. My brain went dead, what to do… what to do??? I needed an image that would fit and I needed some kind of layout. I used the sketch challenge over at Stamp TV, and will be entering this one in the Use It Tuesday challenge, since this is the first time I have used these two stamps, I just joined Paper Craft Planet, I’ll have to figure out how to post it there also, not to mention SCS.


Ok, card details……the image and sentiment is from a Clear Dollar Stamps set called Get Well Critters. I stamped the mouse on white cardstock with onyx black versafine, colored with prismacolored pencils and goo gone, dotted the eye with a black glaze pen, punched it out with a square punch, layered onto green cardstock, then on the pink frame. The dp is from my scrap pile, cut to match the Stamp TV sketch challenge, layered on white cardstock, with a pink base card. The sentiment was stamped in onyx black versafine onto a piece of pink cardstock cut out with a Cuttlebug Slider Die, with a ribbon run through it. Thanks for stopping by, I hope you enjoyed my redneck tutorial and I’d love to hear your comments.

Thursday, February 10, 2011

Deer Dreams

Here is a card for the color challenge that ends today at Stamp TV. I don’t think these colors do a thing for me, my brain just went dead everytime I tried to come up with something new.


While looking through the book I keep samples of my punches and dies in, I ran across the Quik Kutz deer die (I think instead of deer they should have called it a fawn) and an idea finally began to form, a fawn thinking about it’s Mother and Father. I used the GKD set Life is Good by Theresa Momber. The two small deer were stamped in onyx black versafine on pink and punched out with a scallop punch. The sentiment was stamped in versamark and embossed with detail black ep. The pink corner pieces were cut with a Sizzix Sizzlets Elegant Enhancements die. The dp is from a DCWV mat stack. It is layered on black and the base card and the Quik Kutz deer are my version of sweet mango. Thanks for stopping by and I’d love to hear your comments.

Friend's Hand

Oops, I did it again!! No I’m not Britany Spears, wish I had her money though. After making two cards correctly for the Stamp TV sketch challenge, and having a senior moment on my third card by cutting the dp backwards, I decided to make another card using the leftover piece of dp from the previous card. I had to cut the corner pieces backwards for them to work, so this card is backwards too, but like in my previous card………..why waste it.

This is another image from the Inkadinkado set Boxed Wishes. This time the image was stamped in really rust, cut out and embossed with a nestie rectangle, then layered on a piece of rust cardstock also cut and embossed with a nestie rectangle. The dp is layered on white and the base card is a blue-gray. Thanks for stopping by, I’d love to hear your comments.

Wonderful Day


I just love doing these challenges. Here is another card I made, for the Stamp TV sketch challenge and the Use It Tuesday challenge, after making the first two cards correctly,  I had a senior moment and cut the dp backwards, oh well, why waste it.

The image is from an Inkadinkado set called Box Wishes, stamped on white cardstock with versamark and embossed with Stampendous blue tinsel ep. The image was then cut out and embossed with a nestie rectangle.  The layer behind the image was a piece of white cardstock cut out with a nestie scallop rectangle, I ran a versamark pen along the edges and embossed with the same ep as the image. The dp is from my scrap pile more than likely from a DCWV stack, layered on white and the base card is a rust color. Thanks for stopping by, I’d love to hear your comments.