Showing posts with label Use It Tuesday. Show all posts

Tuesday, May 17, 2011

Celebrate Bling

Sometimes I think I just try to hard to come up with a card for a challenge. This one fell right into place and will be submitted for challenge #7 at Use It Tuesday to add bling. I also used sketch #SC332 from SCS.

Maybe the fact that it has been dumping the rain down made me chose an image from an old SU set called Send A Celebration, that I have never used. After choosing that stamp, I thought of some dp I had in my scrap pile and a card started to develop.

The image was stamped on white cardstock with Versamark, embossed with detail gold embossing powder, cut and embossed with a Nesties rectangle die.  Then I started coloring in the raindrops with a Sakura clear glitter pen, and also ran it around the outside embossed area of the rectangle. Next I painted the flowers with stickles. I had a bottle of Scribbles (iridescent white mist) 3D paint in with my stickles, so I figured what the heck, I painted the envelope. This piece was then set aside to dry, because I know me…..sooner or later I ‘d lay something on it or stick my hand in the wet stickles. I did have to pick it up to get a measurement for the next layer, and very carefully did so, without messing anything up, then put it back out of harms way.

The turquoise layer was just cut to size. Then I started working on my next layer. I chose yellow and a MS Punch Around the Page set called Cherish. The 3 1/4” x 3 1/4” square was too small, so I cut it in half and spread it apart, hoping I had some ribbon in my tons of ribbon stash that would cover the gap. I found some gold ribbon that was perfect, but…..I put it on with the wrong side out, because the back side had more bling than the correct side, and bling is what the challenge is about. Now back to the yellow punched layer….I decided to do what I think is called Faux Stitching, by using a Sky Star Sakura Gelly Roll pen (more bling) and connected all those little holes on the inside that were just begging to be sewn, and skipped some stitches on the outside holes.

The next layer is dp I had in my scrap pile from a DCWV Flower Shower Spring Stack, with a ticket punch used on each corner. For the next layer of turquoise I used a corner rounder punch. The base card is the same yellow as the punched layer.

By the time I had all the layers done, my image was dry, but……I had a white background, white umbrella and a painted white envelope, so I grabbed my Twinkling H2O’s for more bling and painted the umbrella and background. After the card was assembled Faux brads were created by punching a piece of scrap yellow with my Crop-A-Dial, gluing in place, then adding stickles. I then decided to add just a little more bling by coloring the rainbows and raindrops on the dp with the Sakura clear glitter pen, and wouldn’t you know it, I stuck my hand in the wet stickles on one of the Faux brads.

It is very hard to get a picture of the glitter & shimmer maybe this close-up will help a little. I believe if you click on the picture you can get a better view.

Thanks for stopping by, and I’d love to hear your comments, they really make my day.

Happy Stamping!
judy

Sunday, May 15, 2011

Flower Bling

Challenge #7 at Use It Tuesday is to add bling. I have had a lot of ideas but every time I think it’s a great idea, turns out it is a stamp I have already used.

I don’t believe I have ever used this stamp from a SU set called Flower Garden. It was stamped with Memento Tuxedo Black Ink on white cardstock, then cut and embossed with a Nestie oval die. Before removing the die I sponged Tumbled Glass Distress Ink around the image. Next I colored the image using cheap metallic ink pens with a watebrush to have shimmer. The next layer was also white, cut with a Nestie scalloped oval die, and also sponged with Tumbled Glass Distress Ink.

For the next layer, the Acrylic Distress Technique was used. The cardstock was white, it was run through the Cuttlebug with a Scrollwork embossing folder. I used an Adirondack Acrylic Paint Dabber in Pearl,  sanded the raised areas, sponged  Dusty Concord Distress Ink all around the frame, spritzed some water on a paper towel and wiped. The Pearl paint also has a shimmer to it. The base card is close to the Tumbled Glass color. After the card was assembled I added some yellow gems to the flower centers and clear ones to every other scallop.

I picked these little gems up at the Dollar Tree a while ago, they were with the fingernail stuff. I can’t imagine adding them to my fingernails, I almost went blind adding them to this card.

In the picture above, you can see some of the shimmer on the embossed part, but the shimmer on the flowers doesn’t show ,so here is a close-up of the shimmery flowers and the bling.

Thanks for stopping by, it really makes my day to read comments.

Happy Stamping!
judy

Friday, May 6, 2011

Wagon Boy

For today’s card I combined two challenges, Crafty Secrets over at SCS to watercolor and Use It Tuesday challenge #6 to add fasteners.

I won this stamp set from the generous Sandy Redburn, owner of Crafty Secrets, by leaving a comment at a blog hop. I used a couple of the other stamps in the set for challenge #5 at Use It Tuesday (Kite Boy), so I figured I try another card for the #6 challenge using four more unused stamps. The images aren’t actually water colored, I used an Alcohol Ink Refillable Pen on glossy paper which is supposed to give a water colored look. I tried this technique the other night, using an alcohol pen filled with plain old isopropyl alcohol 91%, I started with that pen tonight, but wound up filling another with the blending solution, to see if there was a difference, and yes there is. When applying the ink with plain alcohol, you can not go back and blend, whatever color you have on the paper that dries, stays that way, no matter how much you try and change it, but the blending solution will.

I stamped the four images from the Crafty Secrets set Little Boy with Versamark on glossy paper, applied detail black ep and heat embossed. The little boy was colored first using the alcohol filled pen. After I finished coloring him with the pen and the dried alcohol inks that I had in my palettes, Just for kicks and giggles, I gave the boy two different colored socks, I could just picture a little boy getting dressed and grabbing socks that didn’t match, my husband does it all the time, but at least they are white. It must be a guy thing, like using a remote control. Both of the little boys socks are in the brown range, but one is more a rust color, the card holder just about blocked it when I was taking pictures.I decided to try a pen with blending solution and colored the wagon next, then the dog, poor thing it must be a mutt, next was the frog. I went back over the boy with the blending solution pen and found out it would not change what I had already done, so I added some more ink.

For the background I cut a piece of white cardstock to size, then added dots of Aleene’s Quick Dry Tacky Glue, smeared with my finger, and let it dry. Next I sponged an assortment of Distress Inks, tumbled glass, broken china, stormy sky & wild honey (for the sun) over the white, and came up with a really weird color sky. I spritzed a little water on a paper towel and wiped the ink off of the clouds. A MS grass border punch was used for the three layers of grass, the front two rows were sponged with peeled paint Distress Ink. I grabbed a large button and used an Adirondack Acrylic Paint Dabber Sunshine Yellow and painted the button, then sprinkled some glitter on it (Making Memories Scrapbook Shimmer school bus) and let it dry. The button is attached to the card with a piece of yellow ribbon. The wagon was put in place and two black buttons sewn on for wheels, next the little boy was put into place, the top half of his body has foam dots attaching him. The puppy was stuck on top of the wagon and there are foam dots behind his head. I didn’t really know where to put the frog, and I already had it cut out, so I just stuck it in the grass. The dp is from a DCWV All About Boys stack, cut to size and the corners were punched with a corner punch that I don’t know the name of, layered on a bright green with an orange base card.

Thanks for stopping by, and I love reading your comments.
Happy Stamping!
judy

Tuesday, May 3, 2011

The Graduate Going Places

Today’s card is another entry for challenge #94 at HM&F, and I can also enter it for challenge #6 at Use It Tuesday.

When I checked out my House Mouse stamps for something I could use for this challenge, I ran across The Graduate stamp. I know the mouse isn’t moving in any way, shape or form, but to get somewhere today you must be well educated!! So I am taking that road (pun intended) for this card, I think that most graduates dream is to make something out of themselves, and an education is getting them there.

The Graduate was stamped with onyx black Versafine on white cardstock, colored with Prismacolored pencils & Goo Gone. I used a black glaze pen and a white gel pen for the eyes. For the tassel I used a Krylon 18 kt. gold leafing pen. Cut and embossed with a Nesties oval die, and before the die was removed stormy sky & peeled paint Distress Ink was sponged around the image, leaving the outer ring white.

I combined a couple of techniques for the building portion. I saw a video on the Ranger website about the alcohol ink fillable pen. I had thought about getting some of these before, but didn’t want to buy one for each color alcohol ink I have, and after seeing this video, I just had to have one.  I used two palettes and put a couple drops of different colored ink in each well, to have an assortment to start out with, and let it dry. (I need more palettes to have all the colors I have handy.) I also read somewhere else, that you can use plain old alcohol the higher the percentage the better. So I filled my pen with Isopropyl Alcohol 91%. You have to use glossy paper, plain old cardstock does not work, I have not tried it on watercolor paper yet. I stamped the building image from the MFT set Going Places with Versamark and embossed with detail black ep. I tried stamping with some jet black Archival ink, that didn’t work, I didn’t bother with the onyx black Versafine, because that never wants to dry on glossy paper for me, I don’t like SU black because it looks purple instead of black, the only one that I had but didn’t try was jet black Stazon. Each building was colored with a different color alcohol ink.

The next technique I gave a try is the distressed glue technique from Beate John’s blog. When I watched this video, I thought it would be interesting to try it for clouds. I think with a little practice, it will be perfect. I used Aleene’s Quick Dry Tacky Glue, and dabbed the spots, then sort of smeared it a little with my finger, after it dried I sponged stormy sky Distress Ink over it, then wiped with a paper towel spritzed with a little water. The background paper is from a DCWV The Tradewinds matstack, sponged with vintage photo Distress Ink, layered onto white with the edges sponged with the vintage photo, and the base card is maroon. The sentiment is from the same MFT set, stamped on white with onyx black Versafine, and cut to fit the label frame. Two silver brads hold the label frame in place.

For the Use It Tuesday challenge, the MFT building stamp had never seen ink, and I had never used the label frames before, the dp is from a brand new stack, and I used two new (to me) techiniques.

Thanks for looking and I love reading your comments.

Monday, May 2, 2011

Ballet Resist

Here is a card for Challenge #6 at Use It Tuesday, to use brads, eyelets, grommets, buttons, etc..

When I found out what the challenge was, I thought of this stamp I bought years ago and have never used. I don’t know the company name, but the label says Ballet Dancing Doll 2003 limited edition, RS. I think I picked it up at A.C. Moore, but I’m not positive.

Anyway, what made me think of this stamp is the movable arms & legs. The card doesn’t really look that great to me, I think I rushed through it too fast, trying too many different things at once, but I am pleased with parts of it.

I stamped the ballerina on white cardstock several times trying different things that didn’t work. Finally settling on onyx black Versafine. The skin and the blue parts were done with Prismacolored pencils & goo gone. For all of the yellow, green leaves, lips & fingernails, I used SU markers. While coloring the flowers in her hair, I thought of something I saw on the blog of Kittie Caracciolo. Of course I had to try it, I colored some scrap paper with the SU marker, then punched out holes with a 1/4” and 1/8” hole punch, glued the smaller hole in the center of the larger hole, and placed them on a mouse pad and pressed down with a dry embossing tool, then glued them in place over the stamped flowers. A dot of yellow stickles was added afterwards. For the smaller flowers, I grabbed my Crop-A-Dial and punched some more pieces.

You would think the leg and arm on the right side of the stamp would go on the right and the same for the left side, well let me tell you, I have had these arms and legs off and on so many times, it’s a wonder I didn’t have to stamp them over, trying to figure out how they were supposed to be. The arms are attached with yellow brads, the legs with blue brads.

Can you tell I know absolutely nothing about ballet??

The yellow background is another something new (to me) I tried, Cuttlebug wax paper resist. Gina K has a video over at Stamp TV. Along with a sewing machine, my next item I avoid using is an iron. If I can’t wash & wear, I don’t buy, I learned that lesson a long time ago…..after melting something I was trying to iron. Anyway, I cut a piece of wax paper the size of a Cuttlebug folder, (Divine Swirls), ran it through the Cuttlebug, then placed it between two pieces of white cardstock, and ironed, next I sponged rusty hinge Distress Ink over it and wiped with a paper towel.

Having made it this far, I was at a loss at how to finish it, so I just winged it, I punched the left and right edges of the yellow with a MS punch around the page border punch (swirling lace).  added a layer of white, using the same border punch, then sponged the edges with stormy sky Distress Ink. Next I have just a plain layer of black with a white base card. Next I added a punched black strip across the top. I didn’t think the four brads holding the body parts together was sufficient, so I cut another strip of black, and used the corner punch to the punch around the page set to make a tag, grabbed the Rubbernecker sentiment Flaunt It Text, stamped with Versamark, and embossed with detail white ep, added an orange mini brad to each side. Then using the Crop-A-Dial punched three holes for eyelets and added three orange eyelets.

The arms and legs are moveable, but can’t really show that in a picture, so here is another picture with them in a different position.

Thanks for stopping by, and I love reading your comments.

Thursday, April 14, 2011

Kite Boy

Here is another entry for challenge #5 at Use It Tuesday, to use ribbon or twine, something that ties.

This is a brand new stamp set (to me)  from Crafty Secrets called Little Boy, I won this stamp set in a blog hop. The boy, kite, flowers and grass were stamped with this set, isn’t it just darling? I stamped the little boy on  white cardstock, colored with Prismacolored pencils and goo gone, then cut him out. The kite was stamped on some dp from my scrap pile, the sticks colored with SU markers, the kite string is black embroidery thread wrapped around and glued to a piece of a wooden q-tip stick, and the kite tail is something I picked up from my Mother’s stash, (not quite sure what it is, but I think it will unravel) with green ribbons tied around it. I finally found some sky dp in my stash for the background, and the green was a solid piece of cardstock stamped with the grass stamp in peeled paint distress ink. I stamped the flowers with onyx black Versafine, then colored the leaves with a SU marker, stamped the flowers again on white, cut them out and glued them onto the background, with an added touch of yellow and orange stickles. I wanted something else for the sky, so I dug out an old SU set called In The Sky, I think I have had this forever, I know I have never used it, because I had to mount it first. The sun was stamped on a bright yellow cardstock, with onyx black Versafine, then spritzed with a spiced marmalade and copper  pearl spray, I mixed up.  The sentiment is from another Crafty Secrets set called Fishing Buds, it was stamped on the same green with Versamark and embossed with detail white ep, then attached with two flower brads, dipped in Versamark and embossed with detail white ep, and a dab of stickles in the center. The scene is layered onto a piece of solid yellowish-orange, with a dark blue base card.

Creative Clear Stamps Blog
Check out the Creative Clear Stamps Blog, they have a Bunny Hop Game going on (I have a link top right), and you may win prizes. On Saturday 4/16 there will be a blog hop. I’m so excited, as I will be one of the guest participants, the theme for the Creative Clear Stamps is non-card projects. As a guest I am allowed to make cards, I have three projects to show, only one is a card.

 Recipe for Pearl Spray

You will need a mini mister, drop in a small scoop of perfect pearls, an entire dropper full of your favorite color distress inker, finish filling mini mister with water. I add a small bead to help mix it up, by shaking, as the perfect pearls settles to the bottom. When spritzing, make sure you have the mister pointed in the right direction!! I luckily haven't sprayed myself in the face yet, but it could easily be done, and even though I think I have it pointed in the right direction, I either spray to the right or left of what I want to spray, so you want to make sure you are spraying on something easily wiped up, not something the spray will stain.

Thanks for looking, and I love reading your comments.

Wednesday, April 13, 2011

Berry Full

Here is another card for challenge #5 at Use It Tuesday. Siobhan had asked me to make a card using ribbon/twine something that ties, as a guest designer for winning challenge #3. My first card Old Corset is showcased on the challenge page.  I wanted to make another card, since I had used the sentiments on the Old Corset card before, making sure before even beginning this one was totally unused items.
 
For this card I used a House Mouse Stamp called Berry Full Mudpie, that I have had for years and it’s never seen ink. It was colored with Prismacolored pencils & goo gone, cut to size, Milled Lavender Distress ink was sponged around the edges, then it was layered on black. The ribbon is brand new to me, but I’m sure it has been around for a while, I raided my Mother’s stash of ribbons the other week when I was at her house, I only walked away with two boxes full, and it hardly made a dent. I guess it’s considered ribbon, it’s so fancy with the green, red & blue metallic threads. Here is a close-up.
 
I don’t sew, as you can probably tell from the cards I have done with a sewing machine, so unless it’s in the package with a name on it I just call it whatever suits me. I chose a brand new piece of unused dp from my stash, it came from a DCWV Flower Shower Spring Stack, it’s layered on black with a purple base card. Another something I have never done before is use a button on a card, I do know how to sew buttons on that’s a piece of cake compared to a sewing machine. This button was snatched from my MIL’s button bag. The blue metallic cord was also something I snatched at my Mother’s, so that is also something I have never used, and it matched the blue in the ribbon perfectly. I have three gold brads in the top right corner, that doesn’t show up too well, instead of putting them in a straight row, I offset the middle one using a SU Mat pack template. I guess the dp is creating an optical illusion, they don’t look equally spaced. I have used the gold brads before. Now we are down to the sentiment, it’s from The Rubbernecker Stamp Company’s Laundry Days collection called Those Days Text, I don’t believe I have ever used this either, but my sense of humor tends to make me use something like this, so I’m not positive on this stamp. I originally stamped it on black with Versamark and embossed with jeweled gold ep, but when I took the picture, you couldn’t tell what it said, so I removed it, stamped on white with Onyx Black Versafine, cut it out using a pair of SU mountain deckle scissors, which I may have never used, as a matter of fact I haven’t even touched them in years, other than packing and unpacking, when moving my craft stuff from my other house. The edges was sponged with Milled Lavender Distress Ink, then it was layered onto black also cut with the same scissors.

Tuesday, April 12, 2011

Old Corset

As a winner of challenge #3 at Use It Tuesday, Siobhan contacted me about a guest designer spot for challenge #4, but I was unable to have one finished before the deadline, since I was in my non-stamping land,  so she graciously let me work on challenge #5, that will go live today at Use It Tuesday. Today's  challenge is to use ribbon, twine something that ties. This card was actually finished on April 1st.

When I returned to my stamping land I found I had lost my mojo, so I quickly checked out some challenge blogs and started with a simple sketch, after I had finished a few cards, I was almost positive that my mojo had returned. On April 1st, I had a break in trying to create cards fast, for challenges that was coming to an end, and was working on a piece for my Easter cards. Since I received the message from Siobhan at Use It Tuesday, I had been trying to think about what I would create, and with a lost mojo was getting nowhere fast. But in the Use It Tuesday tradition, I was creating cards with stamps I had never used…..ok there was a couple of images I had stamped before, but hadn’t ever used them for anything, but I hadn’t come up with anything for ribbon or twine, something that tied. All of a sudden, it was like a lightning bolt in my head……I thought of the corset for the challenge, and the Easter card got put to the side.

I have had this Cuttlebug corset die for a few years now, and the only time it was used, was to cut a sample for my punch/die notebook. Sometimes I wonder why I buy these things, then never use them, it must have been some great idea……..that got lost in the shuffle. For this one I’m glad using the corset did get lost, it resurfaced at the perfect time!
I started with some red cardstock, cut the corset out, then sat there looking at it, I wanted to stamp something on it, I have two lace background stamps, but the images were just too big, so I settled for a SU set Beyond the Basics (little roses that I have never used), they were stamped with Fired Brick Distress ink. I had in mind to run 1/8” ribbon through the holes, so I decided to add eyelets, from  a collection I bought years ago, and the only time it has ever been opened, was to see if there was some unusual color that matched something I was working on, so I’m positive I haven’t used these red eyelets. I wanted to run black ribbon, but wouldn’t you know it, with tons of ribbon, I didn’t have any 1/8” black, so I settled for the red. My first idea was to stamp inside the corset, but it would be way too much trouble to unlace the ribbon to see it. I sponged Vintage Photo Distress ink around all of the edges. My next idea was to use a Spellbinders Impressibilities – Flourish. I’ve never used this one before before, the instructions said it works best with 65# paper, so I dug some out, (not a big selection) and came up with this yellowish color, after I ran it through the Cuttlebug I sponged Antique Linen distress over the embossed side. Next I cut a layer of black, it started out with a white base card, but just didn’t look right, I could have sponged the Fired Brick on it, but changed to a red base card. This is the first time I have made my own card this size, the others I have made were store bought white. Now it’s time for the sentiment. I thought the sentiments from the GKD set You know you’re old when were perfect…….then it hit me, I have used those sentiments before. Oh well, I am hoping all the other firsts will compensate. I stamped the two sentiments together on red cut out with a Quick Kutz Nameplate die, using Vintage Photo Distress Ink, then cut the black layer, added two red brads and 1/4” black ribbon.

Check out the Bunny Hop Blog Game link on the right for a chance to win prizes, and there will be a blog hop at the  Creative Clear Stamp Blog on 4/16, also they are having their second challenge to use ribbon on a card.

Thanks for stopping by, I would love to hear your comments.

Thursday, March 31, 2011

Farmyard For You

Yesterday while trying to avoid climbing on a little stepladder, I looked in a box of previously stamped items and came up with the Neighborhood jumbo wheel image that I used, I also found a Farmyard jumbo wheel image ready to go. So I used it for this card also an entry for the Stamping 411 sketch challenge #196 (oops too late this challenge has ended), but my main object was to get a card done for the Use It Tuesday Challenge #4 to use the color red in honor of Japan, a donation to the Japanese Red Cross Society will be made based on how many participants. April 1st is the deadline.

For today’s card I used the SU Farmyard jumbo wheel image I had already stamped and colored. It has been done for a while, I just never used it, I believe it was stamped with jet black Stazon, because the black looks black unlike the SU black when you stamp it. It was definitely colored with Prismacolored pencils, I even went over it again yesterday with Goo Gone to try and blend it better. I added yellow Stickles to the sun. Originally picked a whole different red checked ribbon, since I needed red for the Use It Tuesday challenge, so I picked out some red cardstock to try and match the ribbon and the background paper. My background dp is actually a piece of vinyl wall paper, from a wallpaper sample book. I thought it looked countryish (is that really a word, I don’t think so, but you know what I mean.) I used a Tim Holtz distressing tool and distressed the edges of the wallpaper, and also distressed the two edges of the darker red layered directly under the image. By the time I had my image layered the original ribbon I had picked out was too wide, between the image and the ribbon most of the wallpaper was covered so that you couldn’t see the design, so I checked my ribbon stash which has grown considerably since I raided some from my Mother, and came up with this narrower ribbon – still red checked. Instead of placing three plain old brads, I opted for the red hearts….they match the wallpaper hearts. The sentiment is from SU’s Teeny Tiny Wishes, stamped with Versamark, embossed with detail white ep, then punched with a SU word window punch. There would have been a lot of empty space on the punched out sentiment, so I punched the sentiment closer to the left side, then after it was punched, placed it back in the punch through the bottom and cropped off what I didn’t want. After the card was put together, polar white Flowersoft was added to the clouds.
Thanks for stopping by and I’d love to hear your comments.

Thursday, March 24, 2011

Use It Tuesday Challenge

I am still away from my stamps and supplies, so I have no creations to show you, but just wanted to let anybody that checks out my blog know about the generous offer the Use It Tuesday girls are making.

Straight from the Use It Tuesday blog:
Challenge #4
Our challenge this week is related to recent world events:
Please make a project using the color RED in honor of Japan. Remember to use something from your stash you have been hoarding and please tell us in your post or project description what that item (or items) is!
As an added twist...we are going to make a donation to the Red Cross based on the number of participants we have! If we get 1-25 players, we will donate $50; 26-50 players we will donate $75 and so on up to $400! So feel free to get the word out! We would love to make a great donation on behalf of our fellow crafters. :)
Please link your creation using Mr. Linky by Friday April 1st. No blog? No problem! Just use keyword USE004 when uploading to an online gallery and leave us a direct link so we can find your creation. (Linking tips are at the bottom of the post!)
Please make sure to mention you are playing along with a Use It Tuesday challenge (a link is great too!) so we know you are participating.
One lucky participant will be chosen randomly to be a featured guest designer in an upcoming challenge!

Friday, March 11, 2011

Enjoy Teddy

For today’s card I used this week’s sketch from Use It Tuesday, made it with a lot of green for the Spotted Canary green challenge, and made it springy for the Spotted Canary Spring Challenge at SCS.

The main images are from a SU set called Favorite Teddy. The teddy was stamped on a piece of dp from a DCWV Nana’s Nursery Baby Boy Stack, with jet black stazon, the center of the two paws colored with a SU marker, the eyes colored with a black glaze pen and dotted with a white gel pen, then it was cut out, and two green mini brads added at the joints. The wagon was stamped on green paper with Versamark, embossed with detail black ep, the tires colored with a SU marker, cut out and silver mini brads added to the center of the wheels. The cake was stamped on white with jet black Stazon, colored with  gel pens, and cut out. The silk flowers are held together with green flower brads on a piece of green cut out with a Cuttlebug slider die, which has the ribbon run through it. I cheated on the sketch, there is no bow, and there is no layering for the main image. The plaid dp is from my scrap pile, layered onto green, the top and bottom was punched with EK Success border punches, the candles were colored with glaze pens. The background dp is from a DCWV Spring Stack, layered onto green, with a white base card. For the sentiment instead of stamping, I used the enjoy brad from my stash, I left it blue for some contrast. The balloon brads were pink, they were stamped with Versamark and embossed with green tinsel ep. I tied some black thread to the balloons and ran the thread to the wagon handle.  

It didn’t do me a lot of good to jot down my ideas the other day, I have lost the paper, but I did remember about stamping the teddy on dp.

Thanks for stopping by, and I’d love to hear your comments.

Thursday, March 10, 2011

Bug In Ear

I finished another card for the Use It Tuesday Sketch Challenge and I can also enter it at the Spotted Canary for the green challenge. This is one of those ideas I jotted down so I wouldn’t forget it.  


For today’s card the main image is from a SU set called Nature’s Wonders. I bought this set used, but have never used it myself. I had a hard time figuring out how to use it…..stamp in a color, stamp with Versamark & emboss, color with chalks, watercolor, Pearl Ex…….you know what I mean? First I tried it with Shabby Shutter distress ink it was too light. So I decided to use Versamark on white and emboss with detail black ep, then I colored it with metallic gel pens and a waterbrush, and for some extra bling  I added a clear glitter gel pen, sponged the Shabby Shutter distress ink over the black, which really only shows around the edges that I didn’t trim off. The eyes kind of got lost in coloring them and I wanted them to stand out, so I used a black glaze pen on them, then decided to use black stickles to make them glittery, laid it to the side to dry, thought of something grabbed it up and stuck my finger in the wet stickles, oh well it’s a lopsided eyed bug! The next layer is an orangish color, I used a Plaid Essentials Paper Tearing Ruler that I just had to have probably 5-6 years ago and don’t think I have ever even had it out of the plastic it came in. The next layer is dp from DCWV The Café Mediterranean matstack (I have used both of the dp’s before on this card), punched with a McGill punch for the ribbon to run through it. Next is the green layer cut and embossed with a Spellbinders Piercerabilities 5 ½” Fancy Scalloped Border, (never used) then pierced the holes before removing the die, the embossing was sponged with Peeled Paint Distress ink. The background dp is from a DCWV Fall Stack, layered on the same green with a light green base card. The dragonfly brads I ran across yesterday, while looking for something else in my brad & eyelet stash, I’ve never used them, don’t even know where I got them. The sentiment is from a CDS set called Thoughtful Notes, it had never seen ink. I tried something new (to me….sometimes I think I live under a rock) on a SU demonstrator’s page (don’t remember where) she was showing how to make an extended tag with a different punch, so I tried it with the SU Word Window punch, and it worked!!! You just cut your paper to the right width, and instead of running the paper through the punch the right way, you push the paper in through the bottom and clip off the end. So I trimmed up my piece of paper, punched one end, then stamped the sentiment in Onyx Black Versafine, then stuck the other end through the bottom of the punch and punched the other end. Many of the sentiments are too long for this punch, now they won’t be.

Here is a close-up of the stamped dragonfly.


Thanks for stopping by, I’d love to hear your comments.

Wednesday, March 9, 2011

Spring Has Sprung

I finally got around to making a challenge card for the sketch challenge at Use It Tuesday. The title is a little misleading as it snowed here today. The past two days were spent working on the fronts of my Easter cards, I thought I was all finished with the front and my DH tells me to make one more. I worked on it a little bit today, but had some ideas for this challenge rolling around in my pea brain, so I took a break from the Easter cards and did a challenge card instead. I jotted down some of my other ideas, at least I won’t forget what they were…....that is unless I throw the paper away.

For today’s card the main image is from a SU set called Flower for All Seasons, stamped with Jet Black Stazon on white cardstock, colored with a combination of prismacolored pencils & goo gone, metallic gel pens and a waterbrush, sprayed with hairspray, then cut out with Nesties Labels Three. Before the Nestie was removed I ran a metallic gel pen around the inside of the die. The blue layer directly under the image was punched with a square punch, then a corner rounder punch. The next layer is green cut out with (the next size bigger than the image size) Nesties Labels Three die and the metallic pen run around the inside before the die was removed. The next layer was a piece I had laying around that I hadn’t used on something else, punched with a MS punch around the page set, and was originally white, it was sponged with Wild Honey Distress Ink. The orangish-yellow w/white polka dot ribbon was run across the dp, the bow was added afterwards, I added the blue brad to help hold it together. The bird dp is from a Nana’s Nursery Baby Boy stack, I saw this card on SCS, yesterday that used the same image with a different dp w/birds that made me think of this paper. The next layer is the same blue as used before cut wide enough to border the dp and had room to use the MS Bird Border punch. The next layer is another piece from the Nana’s Nursery Baby Boy Stack, with the same blue basecard. I used a MS Bird punch for my three birds on the top right. The sentiment is from a CDS set called Spring Trimmings, stamped in Peeled Paint Distress and punched with a SU Word Window punch.

I don’t think I have ever made a card using this image stamp, I know I have never used the bird border punch or the sentiment. I hope I get to make more cards with the ideas I jotted down. Since this card is springy I can also enter it at SCS for the Spotted Canary Spring challenge.

Thanks for stopping by and I’d love to hear your comments.

Friday, February 25, 2011

Bug Catcher

I want to play!! I have the house all to myself, and can play and play all day! It’s miserable looking outside....changing from rainy & foggy, to the sun peeking for a second, to cloudy & real windy, so what better thing to do than stamp???


This  card came about while flipping through  a DCWV The Spring Stack, when I spotted those bugs, out came the Crafty Secrets set Feeling Yucky. I decided to use this week’s sketch challenge over at CPS. I hope it’s ok to enter more than one card. I’m also going to enter it at Use It Tuesday for their challenge to use your hoarded pretty patterned paper…………bugs are not exactly my idea of pretty patterned paper, but the colors are pretty, and it fit so well with the image & sentiment. Those bigger bugs remind me of stink bugs……maybe this card will be stinkin’ cuteJ. Since anything goes this week at Party Time Tuesday’s I’ll go ahead and enter it there too. Maybe I need to get a life?

The main image and the bug in the jar was stamped with versamark on white cardstock, colored with SU markers (red crosses and blue dress) prismacolored pencils & goo gone (skin & hair), black glaze pen (eyes & shoes), black gel pen & waterbrush (bug in jar), then cut out. Before cutting out the bug in the jar, the crystal lacquer had to dry, that was applied to the jar. The sentiment was stamped on yellow with onyx black versafine and punched out with a circle punch. For a backer to the image I chose a green, then a layer of yellow. I wanted bigger circles for this card, and since bigger circles means less background showing…….and I wanted to show off those bugs, I pulled out my Circle Scissor and cut out one layer of the bug dp and a layer of yellow matching the basecard.  Looking back at it, I’m wishing I had cut the bigger circle out of the green instead of the yellow. Behind the circle layers is another layer of the bug dp, then a  layer of green. The corners of the layers were punched with a Southwest corner punch (had to look it up, couldn’t remember the name), and yellow Hippie Hemp (that’s the name on the package) was wrapped around the slits. The nurse is attached with pop dots. I cut around her hand with an exacto knife to insert the jar.

Who knows what I’ll come up with next, ya’ll come back ya hear!
Thanks for looking and I’d love to hear your comments.

Wednesday, February 23, 2011

Lower Cholesterol

I ran across a new (to me) challenge site today called CPS (Card Positioning System) followed the sketch and made this card to enter for CPS #206. I’m going to enter it in the Use It Tuesday’s challenge USE002 also, because this is a lot prettier dp than the other card I submitted, and I can also submit it to Party Time Tuesday's PTT #4 cause it's anything goes this week.


The main image is an American Art Stamp called High Heels. You can’t clearly read the sentiment because of the card holder, it says : THE DOCTOR TOLD ME TO LOWER MY CHOLESTEROL…SO NO MORE HIGH HEELS! The image was stamped on white with onyx black versafine. I colored the skin with prismacolored pencils and goo gone, the rest of the image was colored with cheap gel pens and a waterbrush, sprayed hairspray on it, then cut it out with a nesties rectangle. I like this technique because it makes the image shimmer. I have a close-up picture below. I just wanted a little frame around it so I trimmed up a piece of the light blue cardstock just to peek out around it. The next layer is a piece of patterned paper, it may not show up in the picture, but it has very light squares on it, cut with a circle nestie, with a light blue layer cut with a scalloped circle nestie, then I used a different patterned paper for the next layer, backed by a piece of red. Both of the patterned paper is from a DCWV Spring Stack. After, I put the layers together,  I did the sewing with three different stitches, then attached the layers to the light blue base card.

I don’t know about the rest of you, but I do not have a lot of patience. I bought a Singer Pixie Plus sewing machine a couple of years ago, because I like the looks of some of those cards out there with sewing on them. I finally got it out of the box and managed to make a card back on the 3rd of this month. Since the third it has mainly been sitting in the floor of my craft room, because the needle came unthreaded, and I broke my needle threader trying to rethread it. I finally got it threaded, and the thread messed up and unthreaded it again, in the middle of making a card, so back in the floor it went until today. I figured I’d give it another try. I’m sure if someone out there had a video camera they could win prizes from America’s Funniest Video, videotaping me with the sewing machine. Because I had fooled around so much with it before, I had to change the thread and bobbin, so I would have thread to work with, had to drag out the book for this, maybe I should have paid more attention to sewing in school, I think I failed this part of home economics which I believe I did mention in another post.  I used three different stitches on this card, as you can see, I need plenty of practice!!  I have yet to figure out how it punches the holes, but skips putting thread in them, as I am sewing along. The good news is, it didn’t come unthreaded and the thread didn’t get all tangled up again. With a little practice, I might get this down somedayJ

As promised here is a close-up of the shimmer that using cheap gel pens and a waterbrush creates.


Thanks for looking, and I’d love to hear your comments.

Tuesday, February 22, 2011

Chunky Dunk

This card is for a challenge at Use It Tuesday We want you to cut into that piece of pretty, pretty patterned paper you have been hoarding and actually make something with it!


I have all kinds of patterned paper hoarded. I have used some out of different stacks, but it’s hard to remember which ones. I picked up a DCWV The Summer Scrapbook Kit in a Stack and flipped through it, I don’t think I have ever used any of this stack. When I saw the background dp for this card, I knew that I wanted to combine a couple different stamps, the sentiment is a brand new one (to me) from Creative Clear Stamps called Chunky Dunk, the main image is a Rubbernecker stamp called Ethel in swimsuit. Now I have itty bitty teeny weeny yellow polka dot bikini, going through my head, so I have to do some paper piecing. I know the background is not some pretty, pretty patterned paper, but I had to go with the flow. This card has a lot of hoarded items on it, not just paper. The white base card is from a brand new pack (I needed a bigger card) The blue layers, the striped layer and the background dp are all from same stack listed above, and as far as I know never used. The main image (Ethel in Bikini) was stamped on white cardstock with onyx black versafine, colored with prismacolored pencils and goo gone. The bikini was stamped again on yellow with white polka dots dp, along with the towel stamped on some polka dot dp from my scrap pile (I cheated here). I used a black marker to fill in the polka dots on the bikini (dah! I should have just stamped on yellow paper), and her earrings, a green marker for the flip flops. The image was masked and I stippled around her with distress inks (tumbled glass, pumice stone and old paper), cut out with a nesties labels six die, and sponged some more distress ink around the edge. Crystal lacquer was added to the glasses, after the card was all put together. Another hoarded item, is the green things on each corner of the main image, I don’t know what they are called, and evidently didn’t know how to mount them either, you can see the impression from my crop-a-dial on the first one I put in on the bottom right.  The sentiment was stamped in onyx black versafine on white and cut with a nestie labels twelve. I also added a piece of matching green ribbon.

Thanks for looking and I’d love to hear your comments.

Saturday, February 12, 2011

Redneck Tutorial - Critter Frame

I was sitting here today, watching some videos on how to do different techniques over at Paper Craft Planet, wondering why I couldn’t think up something. I guess I’m just a day late and a dollar short! Well, I went back to my craft room to try and make a frame with a border punch, like in one of the videos. Mine didn't turn out right, but, while I was sitting there trying it out, the thought occurred to me about taking a square piece of paper and folding it in half diagonally, so I tried it. I’m not sure, but I don’t think anyone has done this yet, to use a border punch and punch all the way around a square without using a corner punch. I definitely was not ready to make a tutorial, but I gave it a try, you can just call this a redneck tutorial J.

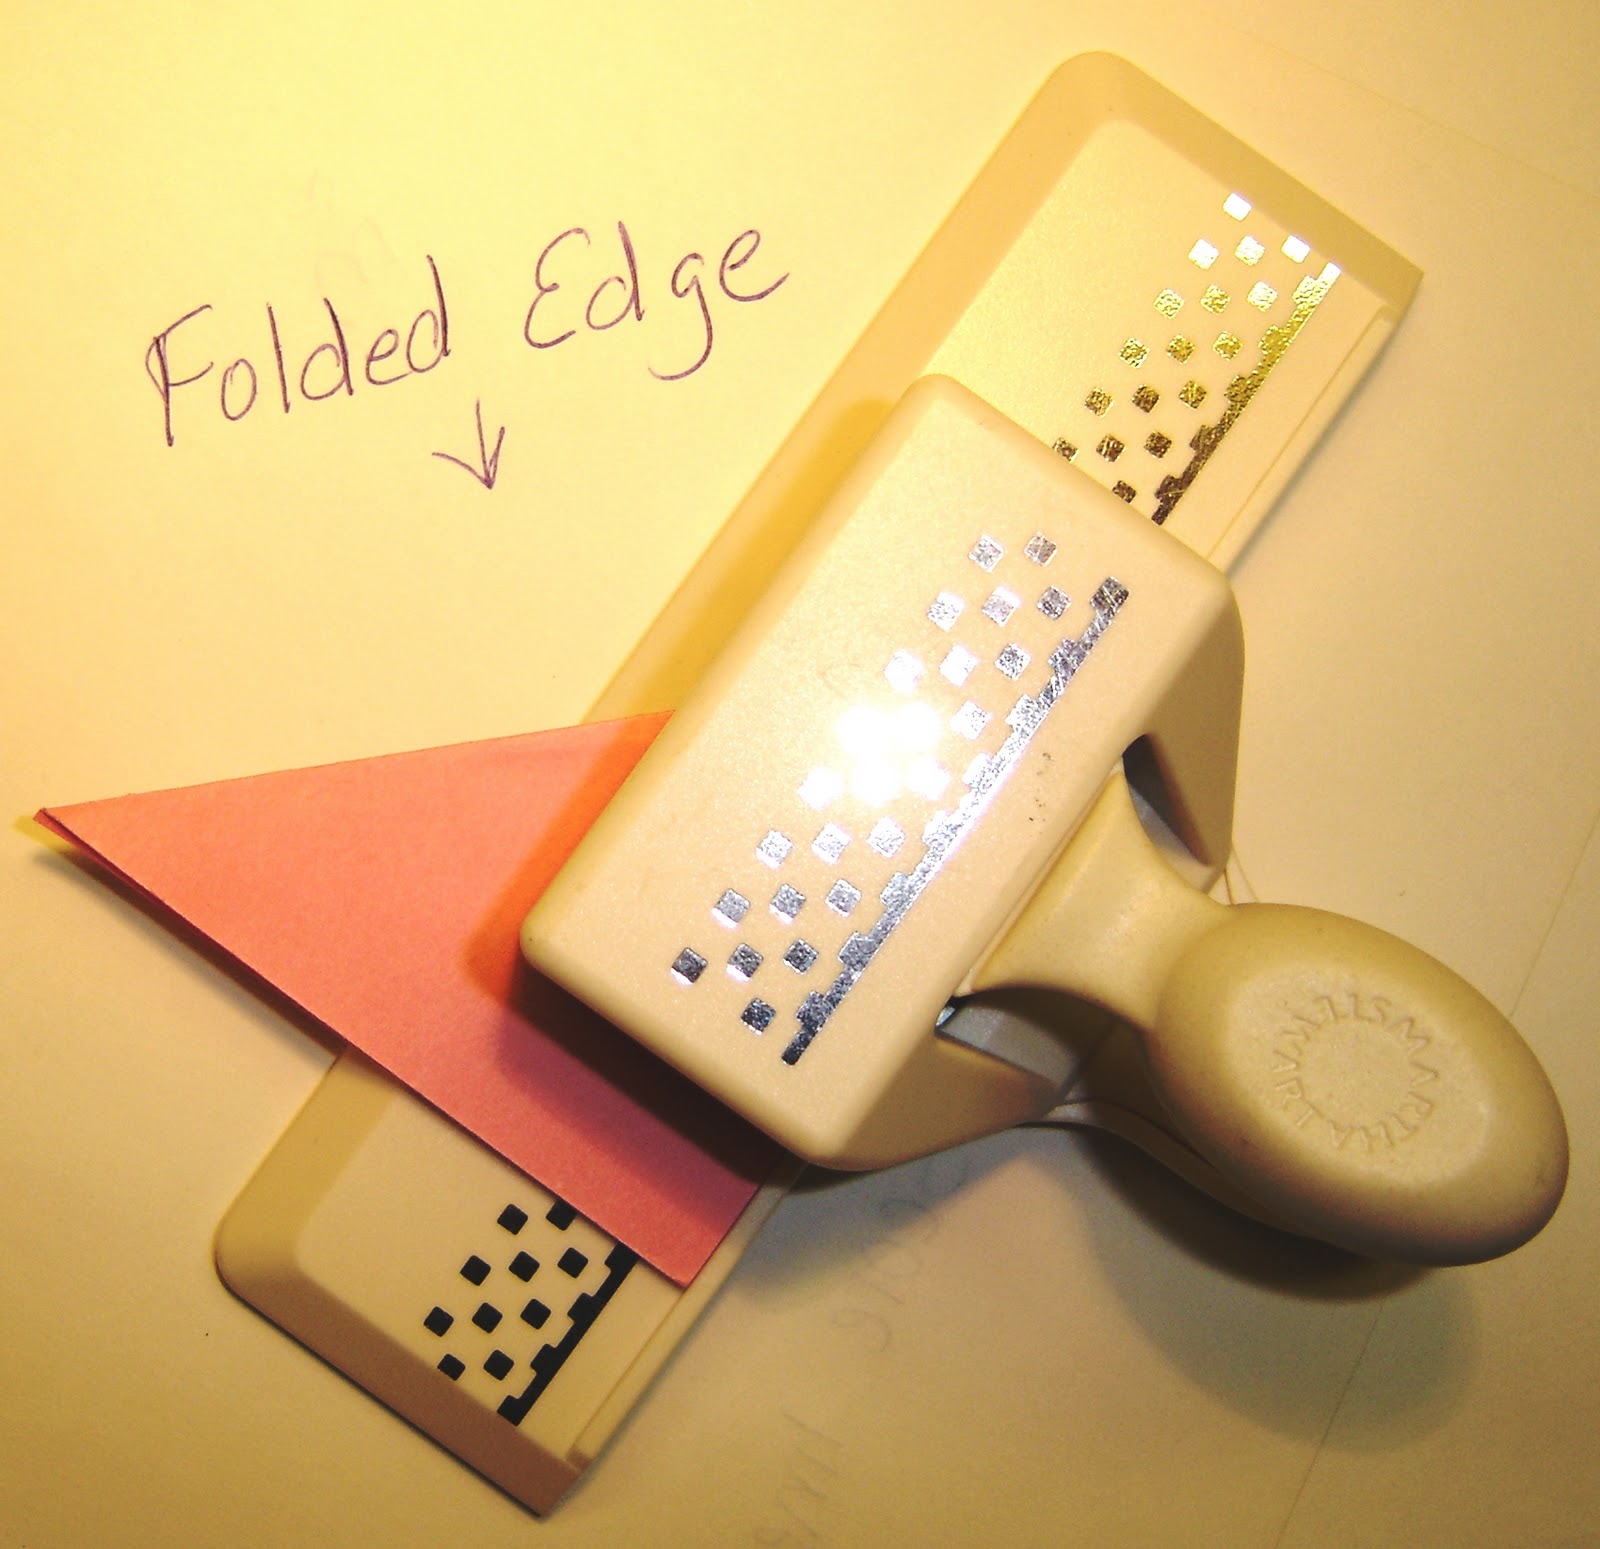
Step 1 – I cut a piece of paper 3” x 3”. (I had already done step 2 before I took this picture)

Step 2 – Fold and score diagonally.

Step 3 – Place in border punch, with scored fold away from punch, I looked at the bottom of the punch and lined the point over at the far edge and punched. (Heavy weight cardstock may not work doubled in the punch.)
Step 4 – Turn the piece around and punch other side the same way.

Step 5 – Fold and line up holes in opposite diagonal direction, you can  score it, but the holes may not line up. Lineup holes with the diagram on the edge of the punch, making sure it is far enough into the punch to complete the row.
(I forgot to take a picture)
Step 6 – Turn the piece around and punch other side the same way.

Step 7 – Completed frame.

**Make both folds in the same direction, place the scored side away from you, the folds don’t show up so bad.**

Since I invented something, (at least I think I did) I wanted to show it off in a card. My brain went dead, what to do… what to do??? I needed an image that would fit and I needed some kind of layout. I used the sketch challenge over at Stamp TV, and will be entering this one in the Use It Tuesday challenge, since this is the first time I have used these two stamps, I just joined Paper Craft Planet, I’ll have to figure out how to post it there also, not to mention SCS.


Ok, card details……the image and sentiment is from a Clear Dollar Stamps set called Get Well Critters. I stamped the mouse on white cardstock with onyx black versafine, colored with prismacolored pencils and goo gone, dotted the eye with a black glaze pen, punched it out with a square punch, layered onto green cardstock, then on the pink frame. The dp is from my scrap pile, cut to match the Stamp TV sketch challenge, layered on white cardstock, with a pink base card. The sentiment was stamped in onyx black versafine onto a piece of pink cardstock cut out with a Cuttlebug Slider Die, with a ribbon run through it. Thanks for stopping by, I hope you enjoyed my redneck tutorial and I’d love to hear your comments.

Thursday, February 10, 2011

Wonderful Day


I just love doing these challenges. Here is another card I made, for the Stamp TV sketch challenge and the Use It Tuesday challenge, after making the first two cards correctly,  I had a senior moment and cut the dp backwards, oh well, why waste it.

The image is from an Inkadinkado set called Box Wishes, stamped on white cardstock with versamark and embossed with Stampendous blue tinsel ep. The image was then cut out and embossed with a nestie rectangle.  The layer behind the image was a piece of white cardstock cut out with a nestie scallop rectangle, I ran a versamark pen along the edges and embossed with the same ep as the image. The dp is from my scrap pile more than likely from a DCWV stack, layered on white and the base card is a rust color. Thanks for stopping by, I’d love to hear your comments.

Tuesday, February 8, 2011

Faux Pressed Flowers

This card is for two different challenges, see this week’s sketch challenge at Stamp TV here, and this week's challenge at Use It Tuesdays here.


I decided to try the Faux Pressed Flowers technique for my card. The wheelbarrow and sentiment is from a GKD set Funny Farm, stamped on white cardstock with onyx black versafine, then colored with prismacolored pencils and goo gone, for the handle and leg SU markers were used. Tumbled glass distress ink was stippled all over the white, and sponged around the edge of the oval after it was cut out with an oval nestie. The flowers were punched out with a SU flower punch from some scrap paper in some matching colors to the dp, glued in place and then run through the cuttlebug with a houndstooth ef. The dp is from my scrap pile, layered onto purple with a green card base. After the card was put together, I dabbed glue on some of the flower centers and added Flowersoft from the pastel and rainbow sets. Thanks for looking and I would love to hear your comments.