Showing posts with label Creative Clear Stamps. Show all posts

Monday, May 9, 2011

Photo Holder

Here is another altered item for the #3 challenge at Creative Vision, I finished after the challenge ended.
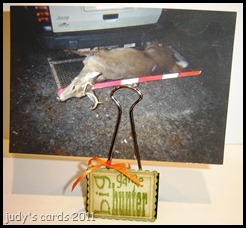

I used a stamp from the retired Gone Hunting set, inked up with peeled paint Distress Ink, stamped on white cardstock, sponged with old paper Distress Ink, cut and embossed with a Nestie rectangle die, then sponged around the edges with vintage photo Distress Ink. The next layer was also white cardstock, cut with a Nesties scalloped rectangle die, then sponged around the edges with peeled paint Distress Ink. The two layers were attached to a large binder clip. A ribbon tied into a bow around one side.

I am currently in non-stamping land and won’t have any new projects to show until I can return to my toys.

Thanks for stopping by and I really enjoy getting comments.

Happy Stamping!
judy

Sunday, May 8, 2011

Deer Candy

I was able to finish a couple more projects for the #3 challenge at Creative Vision for altered items, before heading back up the road to non-stamping land, unfortunately the challenge ended on Friday.
 
This is a Wilton Favor Tin, with the lid decorated. For this item, I used a stamp from the Creative Vision Redneck set. It was stamped with Versamark on white cardstock, embossed with detail white ep.  Next I sponged with peeled paint Distress Ink, punched out with a Marvy Uchida scallop punch, then sponged the edges with vintage photo Distress Ink. The scallops don’t show, I was just trying to get a circle that fit inside the lid.  My Nesties weren’t the right size and I overlooked a couple of other plain circle punches, that may have fit.

The tin is filled with mini M&M’s, it’s the only candy I had on hand.

Thanks for stopping by and I’d love to hear your comments.

Happy Stamping
judy

Friday, May 6, 2011

Tile Whisperer

This is my second post today, challenge #3 at Paper Crafting with Creative Vision is to do an altered item.

I started this project a few days ago, and after stamping and stamping and stamping, (each time I smeared the words), I gave up. I guess I was just trying too hard to get it right.  The sentiment is from a old Creative Vision stamp set called Gone Hunting.

This tile is small enough it could be a Christmas ornament, or you could add a magnet on the back. I kind of fibbed, I did get it stamped right one time, when I started, since I was thinking Christmas ornament, I stamped with Blazing Red Stazon….when I think of blazing red, I picture a fire engine. After I stamped it, the color looked pinkish to me, so I quickly wiped it off. I am, and always will be a tomboy, and pink is my least favorite color. I can’t stand the pink guns I have seen for girls, or the women’s hunting clothing with pink. To me pink is a girly girl color, those sissies that scream at the sight of a bug, not one to see out in the woods. So after that I tried and tried with olive green Stazon until I gave up.

I figured I’d work on it today, this time around I stamped with jet black Stazon, and got it right the first time. I wrapped some dark red with gold shimmer around it, glued in place with Aleene’s tacky glue, then tied a bow at the top.

I have been so busy this week getting the log home straightened up for this weekend. My DH is picking his Mother up at the Nursing Home in the morning and bringing her down for the day, some of his family will be gathered here tomorrow, and I won’t be able to play at all Sad smile. Since Tuesday the days have just flown by, I clean a little, play a little, then clean some more. I didn’t even realize until just a little bit ago, that today is the last day for this challenge, so I’ll have to post my other projects later. The sad news is I have to return to non-stamping land tomorrow evening Sad smile, I have lots of grass to cut & weed eating to do. We wanted to get some more turkey hunting in, but unfortunate things kept popping up and preventing us from going. Spring turkey season is almost over here, and we have only been out two times.

Thanks for stopping by, and I love reading your comments.

Happy Stamping!
judy

Saturday, April 16, 2011

Creative Vision DT 5 Blog Hop

Welcome to this month's Special Edition
Creative Vision's Design Team 5 Blog Hop.


There will be random prizes awarded to bloggers who post comments.
Be sure to become a Creative Vision blog follower, if you are not already, in order to be eligible for those prizes. Following the hop Laura, owner of Creative Vision, will give away a few SHOPPING SPREES! YIPPEE!

Today we will hop hop hop our way to each member's blog as they showcase
their collective talent with our hop theme -

Anything But A Card


Here is what I created for today's hop...
I was so excited about being a Guest Designer today, I have three projects to show you. First up stamped with the (old) Creative Vision stamp set Gone Hunting (a new one was just released).  I used a plain white candle and stamped the images with different color distress inks and onyx black Versafine on white tissue paper, for a hunter’s camo combination, then added it to my candle using a heat gun. Here is a list of the colors I used: live 2 hunt/peeled paint, big game hunter/frayed burlap, big old buck/vintage photo, deer/forest moss, camo king/crushed olive & brushed corduroy, camp/pine needles, deer/tea dye, deer prints/walnut stain and private property was stamped with onyx black Versafine. The only stamp I didn’t use was turkey, I ran out of room. I won’t bore you with more pictures around the candle, I think you get the idea.


Next I stamped a tile, using two different stamp sets from Clear Vision, Redneck (for the sentiments), and the foot prints from the (old) Gone Hunting set. The sentiments were stamped with Jet Black Stazon, and the footprints with Timber Brown Stazon. I glued green felt to the bottom, and then sprayed a clear matte finish over the stamped area. I will use this tile in my kitchen for a hot plate along with some others that I have stamped. If you think this is weird, I have been hunting for a long time, just about every one of my t-shirts has something to do with hunting (and I have a lot of t-shirts) I have all hunting themed ornaments on my Christmas tree, and several years ago I stamped deer, bear, moose and other hunting and some fishing related items all over my bathroom wall, including leaves in fall colors on the ceiling. The bathroom was done before I ever thought about stamping cards.

For my last project,  as a Guest Designer I was allowed to make whatever I wanted, so I also made a card, using the Clear Vision Redneck stamp set. The dp is from a DCWV Fall Stack. The sentiments were stamped on light blue with Frayed Burlap Distress ink, layered onto a dark brown. The dp (trees) was cut to size and layered on light blue, the next layer is the background circle dp, layered on white, with a light blue base card.

Thanks for stopping by, hope you enjoyed my projects.

Visit Creative Vision's Company Blog for a list of winner's tomorrow.


PLUS the Bunny Hop games winner's will be revealed as well.

Thanks for visiting now On with the hop, next up is...

Laura
followed by the rest of the design team members
D'Anne

Jenn 
Molly
Joan
Silke
GUEST DESIGNER - Judy (that is me and you are here)

Friday, April 15, 2011

Deer Whisperer

Today’s card is another entry for challenge #2 at the Creative Clear Stamps Blog to use ribbon, you still have a little time to play along. Hopefully you have checked out their blog, you may win prizes with the Bunny Hop Game (link on right) and a blog hop on 4/16.

For this card I chose the Creative Clear Stamps set Redneck. This set and the Gone Hunting sets are right up my alley!

You might be a redneck if…....no bows were added to my entries because the only bows I associate with hunting are compound, recurve & crossbow.Smile

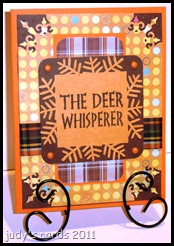
I chose an old SCS sketch SC255 and changed it up a tad. The colors in the picture are a little off, the base card is a bright orange, the next layer is a dark brown, it came out of my scrap pile  and had been embossed with the Cuttlebug Swiss Dots ef, it turned out to be the same size as the dp, but I liked how it showed off the punched corners on the dp. The polka dot dp was punched on each corner with a MS corner punch, I don’t know the name. I used the same solid bright orange for the layer beneath the plaid dp, and used a corner rounder punch on the plaid dp. Both pieces of dp are from a DCWV Fall Stack. The ribbon is also plaid and wrapped around the bottom four layers. The next layer is dark brown just cut to size for the top layer and also punched with a corner rounder punch. The top layer was cut to size, punched with a MS border punch and stamped with Onyx Black Versafine. I attached these two layers over the ribbon and placed four orange brads on each corner.

Thanks for stopping by and I really do love reading your comments.

Wednesday, April 13, 2011

Berry Full

Here is another card for challenge #5 at Use It Tuesday. Siobhan had asked me to make a card using ribbon/twine something that ties, as a guest designer for winning challenge #3. My first card Old Corset is showcased on the challenge page.  I wanted to make another card, since I had used the sentiments on the Old Corset card before, making sure before even beginning this one was totally unused items.
 
For this card I used a House Mouse Stamp called Berry Full Mudpie, that I have had for years and it’s never seen ink. It was colored with Prismacolored pencils & goo gone, cut to size, Milled Lavender Distress ink was sponged around the edges, then it was layered on black. The ribbon is brand new to me, but I’m sure it has been around for a while, I raided my Mother’s stash of ribbons the other week when I was at her house, I only walked away with two boxes full, and it hardly made a dent. I guess it’s considered ribbon, it’s so fancy with the green, red & blue metallic threads. Here is a close-up.
 
I don’t sew, as you can probably tell from the cards I have done with a sewing machine, so unless it’s in the package with a name on it I just call it whatever suits me. I chose a brand new piece of unused dp from my stash, it came from a DCWV Flower Shower Spring Stack, it’s layered on black with a purple base card. Another something I have never done before is use a button on a card, I do know how to sew buttons on that’s a piece of cake compared to a sewing machine. This button was snatched from my MIL’s button bag. The blue metallic cord was also something I snatched at my Mother’s, so that is also something I have never used, and it matched the blue in the ribbon perfectly. I have three gold brads in the top right corner, that doesn’t show up too well, instead of putting them in a straight row, I offset the middle one using a SU Mat pack template. I guess the dp is creating an optical illusion, they don’t look equally spaced. I have used the gold brads before. Now we are down to the sentiment, it’s from The Rubbernecker Stamp Company’s Laundry Days collection called Those Days Text, I don’t believe I have ever used this either, but my sense of humor tends to make me use something like this, so I’m not positive on this stamp. I originally stamped it on black with Versamark and embossed with jeweled gold ep, but when I took the picture, you couldn’t tell what it said, so I removed it, stamped on white with Onyx Black Versafine, cut it out using a pair of SU mountain deckle scissors, which I may have never used, as a matter of fact I haven’t even touched them in years, other than packing and unpacking, when moving my craft stuff from my other house. The edges was sponged with Milled Lavender Distress Ink, then it was layered onto black also cut with the same scissors.

Tuesday, April 12, 2011

Old Corset

As a winner of challenge #3 at Use It Tuesday, Siobhan contacted me about a guest designer spot for challenge #4, but I was unable to have one finished before the deadline, since I was in my non-stamping land,  so she graciously let me work on challenge #5, that will go live today at Use It Tuesday. Today's  challenge is to use ribbon, twine something that ties. This card was actually finished on April 1st.

When I returned to my stamping land I found I had lost my mojo, so I quickly checked out some challenge blogs and started with a simple sketch, after I had finished a few cards, I was almost positive that my mojo had returned. On April 1st, I had a break in trying to create cards fast, for challenges that was coming to an end, and was working on a piece for my Easter cards. Since I received the message from Siobhan at Use It Tuesday, I had been trying to think about what I would create, and with a lost mojo was getting nowhere fast. But in the Use It Tuesday tradition, I was creating cards with stamps I had never used…..ok there was a couple of images I had stamped before, but hadn’t ever used them for anything, but I hadn’t come up with anything for ribbon or twine, something that tied. All of a sudden, it was like a lightning bolt in my head……I thought of the corset for the challenge, and the Easter card got put to the side.

I have had this Cuttlebug corset die for a few years now, and the only time it was used, was to cut a sample for my punch/die notebook. Sometimes I wonder why I buy these things, then never use them, it must have been some great idea……..that got lost in the shuffle. For this one I’m glad using the corset did get lost, it resurfaced at the perfect time!
I started with some red cardstock, cut the corset out, then sat there looking at it, I wanted to stamp something on it, I have two lace background stamps, but the images were just too big, so I settled for a SU set Beyond the Basics (little roses that I have never used), they were stamped with Fired Brick Distress ink. I had in mind to run 1/8” ribbon through the holes, so I decided to add eyelets, from  a collection I bought years ago, and the only time it has ever been opened, was to see if there was some unusual color that matched something I was working on, so I’m positive I haven’t used these red eyelets. I wanted to run black ribbon, but wouldn’t you know it, with tons of ribbon, I didn’t have any 1/8” black, so I settled for the red. My first idea was to stamp inside the corset, but it would be way too much trouble to unlace the ribbon to see it. I sponged Vintage Photo Distress ink around all of the edges. My next idea was to use a Spellbinders Impressibilities – Flourish. I’ve never used this one before before, the instructions said it works best with 65# paper, so I dug some out, (not a big selection) and came up with this yellowish color, after I ran it through the Cuttlebug I sponged Antique Linen distress over the embossed side. Next I cut a layer of black, it started out with a white base card, but just didn’t look right, I could have sponged the Fired Brick on it, but changed to a red base card. This is the first time I have made my own card this size, the others I have made were store bought white. Now it’s time for the sentiment. I thought the sentiments from the GKD set You know you’re old when were perfect…….then it hit me, I have used those sentiments before. Oh well, I am hoping all the other firsts will compensate. I stamped the two sentiments together on red cut out with a Quick Kutz Nameplate die, using Vintage Photo Distress Ink, then cut the black layer, added two red brads and 1/4” black ribbon.

Check out the Bunny Hop Blog Game link on the right for a chance to win prizes, and there will be a blog hop at the  Creative Clear Stamp Blog on 4/16, also they are having their second challenge to use ribbon on a card.

Thanks for stopping by, I would love to hear your comments.

Sunday, April 10, 2011

Certificate Renewal

Today’s card is another try at the Creative Clear Stamps blog challenge #2.

This time I chose to use Creative Clear Stamps sentiments You are old when and Your age requires for my images. I stamped the sentiments on white cardstock with Fired Brick Distress Ink, used a 1-7/8 square punch to punch them out, then lightly sponged more Fired Brick around the edges. The sentiments were layered on  a solid yellowish orange paper semi-matching the stripes on the dp. The ribbon, if you can call it that….it’s more a ribbon/lace combo, red checked ribbon down the center with lacey scallops trimmed in red, anyways I recently snatched this roll and quite a few other rolls of ribbons and some lace from my Mother’s stash. She was hoarding them for crafts, some she has probably had for twenty years, and have been wanting to use this red checked one on something every since I snatched it. The striped dp is from a DCWV Summer stack, layered on red with a base card the same yellowish color as the layers under the sentiment. If you have read very many of my posts, where a sewing machine has been involved, you will know that a sewing machine is not my friend. Well, I decided to try the sewing machine again, I threaded it with some red thread, and started with a straight stitch down each side of the red checked ribbon, then I went for the edges of the dp and red layer with a zig-zag stitch. I think I wound up having to rethread the needle a couple times. My sewing machine might have come to the conclusion it was about to be tossed out a window, and decided to behave accordingly. I added three blue brads to the opposite corners for some extra oomph!

I think this one turned out better than the card I submitted yesterday, but they still seem to be lacking something. I think I have gotten used to using more than one dp, so these are kind of boring.

Thanks for stopping by, and I love reading your comments.

Saturday, April 9, 2011

Redneck Marriage

Today’s card is for the 2nd challenge (ribbon themed) at the Creative Clear Stamps Blog.

I chose to use the Creative Clear Stamp set Redneck. I looked up some past sketches at SCS and came up with SC30. The sentiment We interrupt this marriage was stamped with Walnut Stain Distress Ink on a rust colored solid paper, trimmed to size, and punched with a MS corner punch on the ends to give it a fancy tag look, it was layered onto solid green trimmed up and a corner rounder punch used on the corners. Two copper brads were placed in the holes left from the corner punch on each end. The sentiment to bring you Deer season was also stamped with Walnut Stain Distress ink on rust colored solid paper, with the corners rounded, and a piece of solid green cut for the layer.  I placed a rifle brad above the sentiment and a deer brad below. The deer ribbon is wrapped around the background layers. The plaid background dp is from a DCWV Fall stack, layered on the same solid green as used for layering the sentiments. The base card is the same solid rust color as the sentiments were stamped on.
There was this great idea in my little pea brain, but it just didn’t turn out as well as I had hoped it would. I guess I’ll just have to try again. I’m thinking, I should have reversed the ribbon and sentiments, as the ribbon looks offset, I chose the ribbon mainly for the deer.

Thanks for stopping by, and I really do love reading your comments.

Tuesday, April 5, 2011

Gone Hunting

Today’s project is another card for the brand new challenge at Paper Crafting with Creative Vision blog the theme is monochromatic.
clip_image001

I chose the Clear Vision stamp set Gone Hunting. With the three images I picked out, an old sketch I did at Stamp TV came to mind. Since camo paper isn’t exactly monochromatic, I went with some shades of green to match the dp I picked out from a DCWV Earth Coordinating matstack, that I have had for years. This is one of the very first pack of dp’s I ever purchased.

The images were stamped on a layer of solid green with Forest Moss Distress Ink, then trimmed with a paper cutter. The next layer is dp , a semi-leaf pattern, that I trimmed so much you can’t tell what the pattern is, layered on the same solid green, with a green plaid background, layered on the same solid green, with a darker green (matching the dark stripes in the plaid dp) card base. I distressed all the edges of the dp with a Tim Holtz distressing tool. The lace is Flexi Lace Hem Tape in a leaf color, with three matching green brads top right.

Now you are probably thinking…..why lace on this manly card? Well….it doesn’t have to be a manly card, I have been hunting going on thirty-nine years, and would love to get a card like this. I am very pleased with it (patting myself on the shoulder…..I hope I don’t break my arm). Just today my husband and I was out walking in the woods, looking for turkey sign and mushrooms, then we went trout fishing. The trout fishing was more like we took our poles for a walk, I didn’t catch a thing, he caught two, some of my fingers might be longer than the fish he caught, but it was great to have nice weather and to be out in the woods.

Thanks for stopping by, and I’d love to hear your comments.

Sunday, April 3, 2011

Birthdays Suck

Today’s card is for a brand new challenge at the Creative Clear Stamps blog. I also used the sketch challenge #SK040211 at the Paper Craft Planet Blog.

The Creative Clear Stamps blog challenge is to create a monochromatic card, you get two entries if you use their stamps. For this card I chose one of their sentiment stamps Feeling Old, it was stamped on white card stock with Wild Honey Distress Ink, cut and embossed with a Nesties rectangle die, then the Wild Honey Distress was sponged around the edges. I picked out solid colored paper that matched and used it for the layers, instead of using a Nestie, I just trimmed it up to fit, it doesn’t really show up, but the Distress Ink was sponged around the edges of the two solid rectangles…….I forgot to do it on the birthday labelSad smile. Both the flower and checked dp is from my scrap pile and most likely from some DCWV stack. The checked dp is layered onto a piece of white, just peeking around the edges. The base card is the same color as the layers, I guess you could call it a mustard color. The birthday sentiment is an unknown stamp, it was stamped on that same mustard paper with Wild Honey Distress Ink, cut and embossed with a Spellbinders Ribbon Tag Trio die, then the polka dotted ribbon was run through and wrapped around to the back of the layers.

Thanks for stopping by, I’d love to hear your comments.

Tuesday, February 22, 2011

Chunky Dunk

This card is for a challenge at Use It Tuesday We want you to cut into that piece of pretty, pretty patterned paper you have been hoarding and actually make something with it!


I have all kinds of patterned paper hoarded. I have used some out of different stacks, but it’s hard to remember which ones. I picked up a DCWV The Summer Scrapbook Kit in a Stack and flipped through it, I don’t think I have ever used any of this stack. When I saw the background dp for this card, I knew that I wanted to combine a couple different stamps, the sentiment is a brand new one (to me) from Creative Clear Stamps called Chunky Dunk, the main image is a Rubbernecker stamp called Ethel in swimsuit. Now I have itty bitty teeny weeny yellow polka dot bikini, going through my head, so I have to do some paper piecing. I know the background is not some pretty, pretty patterned paper, but I had to go with the flow. This card has a lot of hoarded items on it, not just paper. The white base card is from a brand new pack (I needed a bigger card) The blue layers, the striped layer and the background dp are all from same stack listed above, and as far as I know never used. The main image (Ethel in Bikini) was stamped on white cardstock with onyx black versafine, colored with prismacolored pencils and goo gone. The bikini was stamped again on yellow with white polka dots dp, along with the towel stamped on some polka dot dp from my scrap pile (I cheated here). I used a black marker to fill in the polka dots on the bikini (dah! I should have just stamped on yellow paper), and her earrings, a green marker for the flip flops. The image was masked and I stippled around her with distress inks (tumbled glass, pumice stone and old paper), cut out with a nesties labels six die, and sponged some more distress ink around the edge. Crystal lacquer was added to the glasses, after the card was all put together. Another hoarded item, is the green things on each corner of the main image, I don’t know what they are called, and evidently didn’t know how to mount them either, you can see the impression from my crop-a-dial on the first one I put in on the bottom right.  The sentiment was stamped in onyx black versafine on white and cut with a nestie labels twelve. I also added a piece of matching green ribbon.

Thanks for looking and I’d love to hear your comments.