Showing posts with label Clear Dollar Stamps. Show all posts

Monday, May 30, 2011

Owl Season

I hope you are enjoying your Memorial Day.

This is another card I slapped together before leaving for non-stamping land. Sadly for me it is the last card I have to show until I can return to my stamps.

The image was a pre-stamped  and colored piece I had done for another card and wound up not using. The image is from a MFT set called Owls of the Season by Stephanie Fizer. The owls, and limb stamped with Onyx Black Versafine, the leaves stamped with Peeled Paint Distress Ink. The owls were colored with Prismacolored pencils. The image was then cut out with a Nestie circle die, and before the die was removed sponged with Tumbled Glass Distress Ink. The next layer of yellow was cut with a Nestie scalloped circle die, each scallop pierced.

The sentiment is from a CDS set called Thoughtful Notes, stamped with Onyx Black Versafine on a piece of yellow cut with a Quick Kutz Label die.

The background is using pieces of scrap paper, something I saw on a video by Gina K at Stamp TV.  I cut my scrap pieces to size, layered onto a piece of yellow cut to size. Cross-stitched between the two alternating dp papers, and a zig-zag stitch around the edge, all of it done by hand. I have given up on my sewing machine, it would have taken me two to three times longer to sew on this card using it. The base card is a light turquoise blue.

Thanks for stopping by, and I love getting comments.

Happy Stamping!
judy

Friday, May 27, 2011

Old Crow

This is another pre-stamped colored image, I had lying around, so I slapped it on a card. I just realized I can enter it in the challenge at Clearly I Stamp for CIC28.

The image is from a CDS set called Something to Crow About, stamped on white cardstock with Onyx Black Versafine, then watercolored using cheap metallic gel pens and a water brush. The metallic gel pens, give the image lots of shimmer. Cut out with a scalloped circle Nestie, then each scallop paper pierced. The next layer of orange was cut with a circle Nestie, and also paper pierced.

The sentiment from the same set, stamped with Soot Black Distress Ink, was set up just like the main image, but paper pierced a little more. The dp layer is from a DCWV Fall Stack, layered onto a piece of orange cut to size, with a dark brown base card. The ribbon is wrapped around and behind the dp/orange layer and a small button brad is holding the bow, made with a bow easy in place.

Thanks for stopping by, and I really enjoy getting comments.

Happy Stamping!
judy

Wednesday, May 25, 2011

Chewable Aspirin

Another Football Frenzy card for challenge #96 at House Mouse & Friends.

This was actually the first image I stamped to go with the acrylic distress background on yesterday’s card, but right in the middle of making yesterday’s card a new idea popped into my head and I switched images.

The main image for today’s card is a HM stamp called Chewable Aspirin. It was stamped on white cardstock with Memento Tuxedo Black ink, colored with Prismacolored pencils, then cut out. I added stickles to the ice cube and drips. The aspirin bottle cotton is a combination of two MS flocking powders (swan & pewter). The eyes were colored with a black glaze pen, and one dotted with a white gel pen, then laid aside to dry.

I started looking for sentiments to go with this image, and that is when the switcheroo of images came about, and when yesterday’s card came about.

The sentiment is from a SU set called Always In My Thoughts, stamped on white with Memento Tuxedo Black ink, then punched out with a circle punch. I decided to specify even more, so I chose the SU set Alphabits, stamped on white with Memento Tuxedo Black, then punched each letter out with a 1/4” hole punch. For this Faux Sympathy card I used Steeler colors (black, gold & white).

The footballs are from a CDS set call Accessory Fun, stamped with Memento Tuxedo Black and sponged with Vintage Photo Distress, cut out, and placed in each corner.

My Raven fan husband loved this card, it even got a chuckle out of him. I am back in non-stamping land now, and I am having withdrawal. I can’t wait to get back to my stamps.

Thanks for stopping by, and I really enjoy the comments.

Happy Stamping!
judy

Sunday, May 22, 2011

Dirt Rides

I have combined two challenges for today’s card, the first being a challenge at Speedy TV, the second is a sketch challenge from CPS. 

I already had another card made for week 56 at Speedy TV, which is tone on  tone with the main image popped to post today, but when I saw the new sketch challenge #219 at CPS, I switched off and made a new card. It’s funny, but my other card has just about the same layout as the sketch challenge, and I hadn’t even looked to see what the CPS challenge was. I will probably post it tomorrow.

I have been playing around with the Acrylic Distress Technique, by trying out different colors, I just love it, as you can probably tell.  Acrylic Distress is done by running your cardstock through an embossing folder, painting it with acrylic paint, after it dries sand the high spots, wipe off the dust and sponge a distress ink over the painted areas, then wipe with a damp cloth. The distress ink will not stick to the acrylic paint. If you missed some spots, or would like the raised spots to be darker, just repeat the steps.

For today’s card I chose the CDS set Dirt Rides. The 4 wheeler was stamped onto white cardstock using Versamark and heat embossing with detail black ep. Next it was colored with Prismacolored pencils and Goo Gone, afterwards I went over all of the green with a water brush dipped in perfect pearls to give it a shimmery look. It was then cut out, stickles added to the headlights and laid aside to dry.

The next two layers of white cardstock, were cut and embossed, one with a Nestie Oval die, the other with a Nestie Scalloped Oval die. A sentiment from the same stamp set was stamped with Versamark and heat embossed with detail black ep on the plain oval. The scalloped oval was sponged with Peeled Paint Distress Ink (my favorite color in the Distress line).

I used a white ribbon over a strip of white sponged with Peeled Paint behind the ovals. The ribbon wraps around the behind the next plain white layer.

Now we come to the Acrylic Distress. I chose a Cuttlebug frame embossing folder from the Heritage Collection, embossed with white cardstock, and trimmed off the outside for a different look. The acrylic paint is an Adirondack Dabber in Pearl, sponged with non other than Peeled Paint.

The white layer behind is just cut to size, with a corner rounder punch used on the corners. The base card is a green cardstock that matches the Peeled Paint.

Thanks for stopping by, I hope you enjoyed your visit, please feel free to leave a comment, they make my day.

Happy Stamping!
judy

Saturday, April 23, 2011

Heartfelt Sympathy Inside

Since I am in non-stamping land, and have run out of pre-stamped cards, I thought I would post the inside of the sympathy card I posted yesterday. (Heartfelt Sympathy)

You always see what everyone puts on the front of a card, but the inside can be another work of art often times not shown. Usually (unless I forget) I take a picture of the front and inside of any card I send, at least that way I don’t send the same sentiments over and over to the same person. This particular card has not been sent yet, but I know eventually it will be.

For the inside of this card I embossed a white piece of card stock cut to size with a Nestie oval, then stamped a sentiment from the CDS set Words of Sympathy with onyx black Versafine. The next layer is black with the white card base.

I hope you have a Happy Easter! Thanks for stopping by,  and I love reading your comments.

Thursday, April 21, 2011

Shaped Sympathy

Today’s card is not for any contests. I decided to work on some sympathy cards. I guess you could say that is a challenge on it’s own.

I have been wanting to make a shaped card with my Nesties Labels eight die, so this was the day to try it out. I cut a piece of black cardstock, so that I could fold it in half and the die would fit on it, I placed the die just above the fold, and cut the two layers at once. The next layer of white was cut and embossed with the next size smaller die. Before removing the die, I stamped the SU background stamp French Script with onyx black Versafine, and ran a black metallic pen around the inside of the die. The next layer is just a piece of black cut with a Nestie oval. The top layer of white  was stamped with a stamp from the CDS set called Words of Sympathy. The black ribbon was wrapped around a bow easy for four loops on each side, then tied off with a black mini brad stuck through the center and through the two oval layers.

Thanks for stopping by and I’d love to hear your comments.

Monday, April 18, 2011

Shower Bunny

Today’s card uses the SCS sketch #328 for a challenge over at Party Time Tuesdays PTT #11 (April Showers).

All of the paper except the white card base is from a DCWV pastel stack. Each polka dot dp has the corresponding solid color with it (except the bunny & the sentiment). The bunny from the SU set New Little Someone was stamped on yellow polka dot dp with onyx black Versafine, then again on the solid green for the bow, and cut out. It was then paper pieced back together. I also stamped the feet on solid yellow for the pads. Before I put the head back on, I used my sewing machine with black thread to stitch over the stitched lines on his belly. I colored over the green ribbon with a clear glitter pen to give it some shimmer. Googly eyes were added after the card was put together. Since I needed four layers, I went with the four different colors in the stack, and this may be dumb, but placed the layers in alphabetical order. Starting with the polka dot blue/solid blue, green polka dot/ green solid, pink polka dot/pink solid and finally the same yellow polka dot as the rabbit/solid yellow. The sentiment is from a CDS set called Designer Label Celebrations, stamped with onyx black Versafine on the solid yellow, then punched with a  circle punch. The bunny and the sentiment were popped with foam dots.

Thanks for looking and I’d love to hear your comments.

Monday, April 11, 2011

Buggin’ Butterfly

This is a card I did on March 31, for the Spotted Canary Spring Challenge over at SCS. I didn’t post it that day, as I was running out of time for the challenge.  It took me over an hour to make this card, and the worst part is the butterfly was already done. Making cards is so time consuming.

I thought I would make one last ditch effort for the Spotted Canary Spring Challenge. I used a butterfly previously done with my own version of the Faux Cloisonné Technique. I stamped on a magazine page with Versamark, but used black ep in place of gold. Instead of cutting the dp (from a DCWV Spring Stack) with the Nesties Labels 8, I cut the bright pink to make a frame, and placed it over top of the dp. A MS butterfly punch was used to punch the little butterflies around the frame from a piece of the scrap dp. The sentiment is from a CDS set called Bugs and Kisses, it was stamped with onyx black Versafine. The base card is a bright yellow.
 
Thanks for looking and any comments.

Thursday, March 10, 2011

Bug In Ear

I finished another card for the Use It Tuesday Sketch Challenge and I can also enter it at the Spotted Canary for the green challenge. This is one of those ideas I jotted down so I wouldn’t forget it.  


For today’s card the main image is from a SU set called Nature’s Wonders. I bought this set used, but have never used it myself. I had a hard time figuring out how to use it…..stamp in a color, stamp with Versamark & emboss, color with chalks, watercolor, Pearl Ex…….you know what I mean? First I tried it with Shabby Shutter distress ink it was too light. So I decided to use Versamark on white and emboss with detail black ep, then I colored it with metallic gel pens and a waterbrush, and for some extra bling  I added a clear glitter gel pen, sponged the Shabby Shutter distress ink over the black, which really only shows around the edges that I didn’t trim off. The eyes kind of got lost in coloring them and I wanted them to stand out, so I used a black glaze pen on them, then decided to use black stickles to make them glittery, laid it to the side to dry, thought of something grabbed it up and stuck my finger in the wet stickles, oh well it’s a lopsided eyed bug! The next layer is an orangish color, I used a Plaid Essentials Paper Tearing Ruler that I just had to have probably 5-6 years ago and don’t think I have ever even had it out of the plastic it came in. The next layer is dp from DCWV The Café Mediterranean matstack (I have used both of the dp’s before on this card), punched with a McGill punch for the ribbon to run through it. Next is the green layer cut and embossed with a Spellbinders Piercerabilities 5 ½” Fancy Scalloped Border, (never used) then pierced the holes before removing the die, the embossing was sponged with Peeled Paint Distress ink. The background dp is from a DCWV Fall Stack, layered on the same green with a light green base card. The dragonfly brads I ran across yesterday, while looking for something else in my brad & eyelet stash, I’ve never used them, don’t even know where I got them. The sentiment is from a CDS set called Thoughtful Notes, it had never seen ink. I tried something new (to me….sometimes I think I live under a rock) on a SU demonstrator’s page (don’t remember where) she was showing how to make an extended tag with a different punch, so I tried it with the SU Word Window punch, and it worked!!! You just cut your paper to the right width, and instead of running the paper through the punch the right way, you push the paper in through the bottom and clip off the end. So I trimmed up my piece of paper, punched one end, then stamped the sentiment in Onyx Black Versafine, then stuck the other end through the bottom of the punch and punched the other end. Many of the sentiments are too long for this punch, now they won’t be.

Here is a close-up of the stamped dragonfly.


Thanks for stopping by, I’d love to hear your comments.

Wednesday, March 9, 2011

Spring Has Sprung

I finally got around to making a challenge card for the sketch challenge at Use It Tuesday. The title is a little misleading as it snowed here today. The past two days were spent working on the fronts of my Easter cards, I thought I was all finished with the front and my DH tells me to make one more. I worked on it a little bit today, but had some ideas for this challenge rolling around in my pea brain, so I took a break from the Easter cards and did a challenge card instead. I jotted down some of my other ideas, at least I won’t forget what they were…....that is unless I throw the paper away.

For today’s card the main image is from a SU set called Flower for All Seasons, stamped with Jet Black Stazon on white cardstock, colored with a combination of prismacolored pencils & goo gone, metallic gel pens and a waterbrush, sprayed with hairspray, then cut out with Nesties Labels Three. Before the Nestie was removed I ran a metallic gel pen around the inside of the die. The blue layer directly under the image was punched with a square punch, then a corner rounder punch. The next layer is green cut out with (the next size bigger than the image size) Nesties Labels Three die and the metallic pen run around the inside before the die was removed. The next layer was a piece I had laying around that I hadn’t used on something else, punched with a MS punch around the page set, and was originally white, it was sponged with Wild Honey Distress Ink. The orangish-yellow w/white polka dot ribbon was run across the dp, the bow was added afterwards, I added the blue brad to help hold it together. The bird dp is from a Nana’s Nursery Baby Boy stack, I saw this card on SCS, yesterday that used the same image with a different dp w/birds that made me think of this paper. The next layer is the same blue as used before cut wide enough to border the dp and had room to use the MS Bird Border punch. The next layer is another piece from the Nana’s Nursery Baby Boy Stack, with the same blue basecard. I used a MS Bird punch for my three birds on the top right. The sentiment is from a CDS set called Spring Trimmings, stamped in Peeled Paint Distress and punched with a SU Word Window punch.

I don’t think I have ever made a card using this image stamp, I know I have never used the bird border punch or the sentiment. I hope I get to make more cards with the ideas I jotted down. Since this card is springy I can also enter it at SCS for the Spotted Canary Spring challenge.

Thanks for stopping by and I’d love to hear your comments.

Monday, March 7, 2011

Little Birdie

Today’s card is just that….a card, it's not for any challenges, and I didn't use a sketch to make it. I have been working all day on my Easter cards and they are not together yet, had to wait for the stickles and crystal lacquer to dry, I have already managed to stick my fingers in the wet stuff a couple times. So I threw this card together instead.

I used a bird image from an Inkadinkado set called Birds Galore, stamped with Versamark, embossed with Guacamole ep from Stamp On Inn, cut out and embossed with a Nesties rectangle die. Before the die was removed, I made a mask for the bird and stippled tumbled glass distress ink all over the white. Next I cut the scalloped rectangle out of a blue semi-matching the tumbled glass color. The white X piece was cut with a cuttlebug die that I have had for a while and don’t know the name of. The dp is from My Minds Eye Photo Mat Blue mat stack, layered on white with the same blue base card. The sentiment is from a CDS set called Cute Quips, stamped in peeled paint distress ink on white and punched with a circle punch, for the blue layer a different size circle punch was used. I used a SU photo corner punch for the two white corners and added silver brads. I used a clear glitter pen for the eye and flowers on the bird.

Thanks for looking, and I’d love to hear your comments.

Thursday, March 3, 2011

Bug Me

Today’s card is another entry for this week’s sketch challenge at Stamp TV.

It’s nothing special. When I finally sat down to work on it, I went brain dead. So I got my trusty notebook out with the copies of all my stamps and paged through it. I picked out a SU set, but kept looking, and spotted the Inkadinkado Patterned Bugs set, then when I turned a few pages the sentiment (Bug me anytime) from the CDS set Cute Quips jumped out at me. I thought about the dp I had used on another card recently and a card was born.

The picture does not show the colors correctly, no matter how I tried editing. The bug images were stamped on a light beige with Versamark, embossed with Joann Craft Essentials Pastel Pink and Ranger Evergreen ep, then run through the Cuttlebug with a stitched square ef, the stitches sponged with spiced marmalade distress ink, then layered onto a light blue punched square. The sentiment was stamped with Onyx Black Versafine, and the rest is the same as the other squares. The dp is from a DCWV Spring Stack, layered on the same light blue as the squares, then I stitched around the whole piece with the sewing machine. Cut a thin light blue strip, with the dp as a layer, put it in place and stitched all the way around it, then attached a strip of black ribbon, and placed the squares on top. The base card is orange.

I didn’t manage to get anything done yesterday, as we were off visiting. Today, for most of the day, I have been splitting, hauling and stacking firewood. My neighbor is moving, and wanted us to take the wood he had down at his house, I borrowed his log splitter this time, instead of splitting by hand. I got it all split, and hauled a good bit up and stacked it. It’s no wonder I went brain dead, I’m kind of tired. I might not be able to move tomorrow.

Thanks for stopping by, I’d love to hear your comments.

Tuesday, February 22, 2011

Just Fuzzy

This card is for a challenge over at Party Time Tuesday’s, since it’s the last of the month anything goes.


To start with I grabbed a bunch of recent cards I have made to decide on what type of sketch I wanted use. Then I picked a piece of dp from a K&Company Hannah Paper Pad. I chose to use a CDS stamp called Fuzzy Ducky. When I picked out this stamp a song from many, many moons ago popped into my head, I only remember a line or two………..little black duck, swimming in the water, little black duck doing what he oughta. I decided to color the image with gel pens and a watercolor brush, after stamping it on white paper with onyx black versafine ink. I was concentrating so hard on how I wanted to put the card together, that I forgot about spraying hairspray on it, until I started cutting it out, and noticed the shimmers on my fingers. It’s not something that has to be done, but I started doing it for images, that are cut out, because I was having more shimmer on my fingers, than on the image by handling it while cutting it out. So after I had some of it cut, I added some more gel pen and watercolored it again, then sprayed hairspray on it, let it dry and finished cutting it out.  My base card is a light pink, then I have a layer of rust, the dp, a darker pink self adhesive ribbon from Darice, two layers cut with nesties labels three, light pink and rust. The sentiment is from a Crafty Secrets set called Feeling Yucky, (I love to mix and match my stamps) stamped on light pink with onyx black versafine.  I made my own label using a MS corner punch, and attached it with brads.

I took several pictures, even with editing the colors just didn't want to cooperate. The ribbon looks like it is two different colors, but it's a pink like under the main image, in most of the pictures it looked rust colored over top of the image. I also tried to get the shimmer to show in a close-up, it shimmers more in real life.


Thanks for looking, and I would love to hear your comments.

Monday, February 21, 2011

Thinking of June

This is my first ever entry to a challenge on Party Time Tuesday’s, it’s for sketch PTT #3. I hope I have it right.

 I used this sketch to make a card for my DH’s Aunt, she is 83 years old, and was still working until a couple of months ago, when she had a stroke.

For this card I chose a pink base card, layered with white, then dp from My Minds Eye Home Photo Mat Pink. I then placed a piece of lace across the center and over that a piece of pink Darice self adhesive ribbon. The main image is from a SU set called A Flower For All Seasons, stamped on white with onyx black versafine ink, colored with gel pens and a waterbrush. The sentiment is from a CDS set called Curved Sentiments, also stamped in onyx black versafine, the white was then cut and embossed with a nesties rectangle die, and layered on a piece of teal colored cardstock cut and embossed with a nestie scalloped rectangle die, then attached to the other layers. The butterflies were punched in red with a MS butterfly punch, the swirls of pink were cut with a Sizzix Sizzlet Scribble Swirl die, attached with glue and the flowers have a brad to hold them in place. The light pink flower is from an artificial stem I tore apart for the blossoms and the darker pink flower under it is a paper flower, from a Paper Flower embellishment jar by Portafolia.

Thanks for looking and I would love to hear your comments.

Monday, February 14, 2011

Moose Birthday

Happy Valentine’s Day ya’ll!!

I don’t think I was meant to stamp today, everything was going wrong. I decided to make a card for a sketch challenge SK021211 at Paper Craft Planet. I picked out the dp I wanted to use for the sketch, and wanted to do some sewing on it, first I had to thread the needle on the sewing machine, which I have been trying to do for the last three days, on the first day my needle threader fell apart, I think they should make the needles with much bigger holes. For the past two days, I spent time trying to get that stupid thread to go through the eye, until I would get frustrated, which didn’t take very long. I finally got the needle threaded, YEAH! I started to sew the center layer, and the dad gum card got stuck in one place, somehow the thread got wrapped around the foot. So guess what? You guessed it the thread broke and the needle is unthreaded again! So much for sewing on a card today, I tossed those pieces aside, the paper pieces that is, the sewing machine almost got tossed too.

Then I picked out some more dp put it together, chose the Clear Dollar Stamp set Moose Friends, and  stamped the image and sentiment on white cardstock, colored with prismacolored pencils and goo gone, stippled tumbled glass for the sky, cut out and embossed with a nesties oval. I decided to touch up the eyes with a black glaze pen, I screwed that up, so I covered the boo boo with mini brads, now the moose looks like it’s wearing sunglasses. The oval is layered on the same brown I used for the base card and the layer for the checked paper. Before attaching the oval, I decided to do some paper piercing, the checked piece was first, I went all the way around, everything was fine, but then I decided to do that dumb squiggly thing. It just looked like a piece of paper with a bunch of holes all over it, so I went dot to dot with a black pen. I should have left that squiggly part off completely. I then paper pierced the corners, which thankfully I didn’t mess up. Thanks for looking, I’d love to hear your comments.

Saturday, February 12, 2011

Framed Critter

Since I figured out how to punch all the way around a square with just a border punch and no corner punch, I had to do it again, this time using the Clearly Inspired Challenge sketch CIC22, the same stamps, but a different border punch. I even opted to drag out some new dp, instead of using more of my scrap pile.

I had never done a tutorial, I gave that a try too, when I finished my first card using the border punch surround and same stamp set with a different sketch……I like to call it my redneck frame tutorial that you can view here.

For this card, since I already knew the mouse from the CDS set Get Well Critters would fit, I went ahead and used it again. First I went through some unused dp looking for what I wanted to use, and found this, it’s from a DCWV Summer Dream matstack, and I think it looks great together (am I prejudiced or what?). The mouse was stamped on white with onyx black versafine, colored with prismacolored pencils, the band-aid also had some bling added with a Sakura clear glitter pen,  then it was cut out with a square punch. The next layer is a scrap of the dp cut to fit, backed with a plain purple piece, cut to fit. The frame started out being a 3”x3” square, then punched with a ms border punch. I could never explain how to do this in writing, so I have a redneck frame tutorial with pictures located here. Behind the frame is a piece of ribbon with the sentiment from same  stamp set, stamped with versamark and embossed with detail white ep on a piece of plain purple cut out with a cuttlebug slider die. Then you have the dp layers, the lighter of the two is layered onto white, the darker layered on the same blue as the frame. The base card is white. I had the card altogether, and was taking pictures of it, when I realized I didn’t have the three items in the bottom left corner, so I added three white pearls. Here is a close-up of the frame.

Thanks for stopping by, and I’d love to hear your comments.

Redneck Tutorial - Critter Frame

I was sitting here today, watching some videos on how to do different techniques over at Paper Craft Planet, wondering why I couldn’t think up something. I guess I’m just a day late and a dollar short! Well, I went back to my craft room to try and make a frame with a border punch, like in one of the videos. Mine didn't turn out right, but, while I was sitting there trying it out, the thought occurred to me about taking a square piece of paper and folding it in half diagonally, so I tried it. I’m not sure, but I don’t think anyone has done this yet, to use a border punch and punch all the way around a square without using a corner punch. I definitely was not ready to make a tutorial, but I gave it a try, you can just call this a redneck tutorial J.

Step 1 – I cut a piece of paper 3” x 3”. (I had already done step 2 before I took this picture)

Step 2 – Fold and score diagonally.

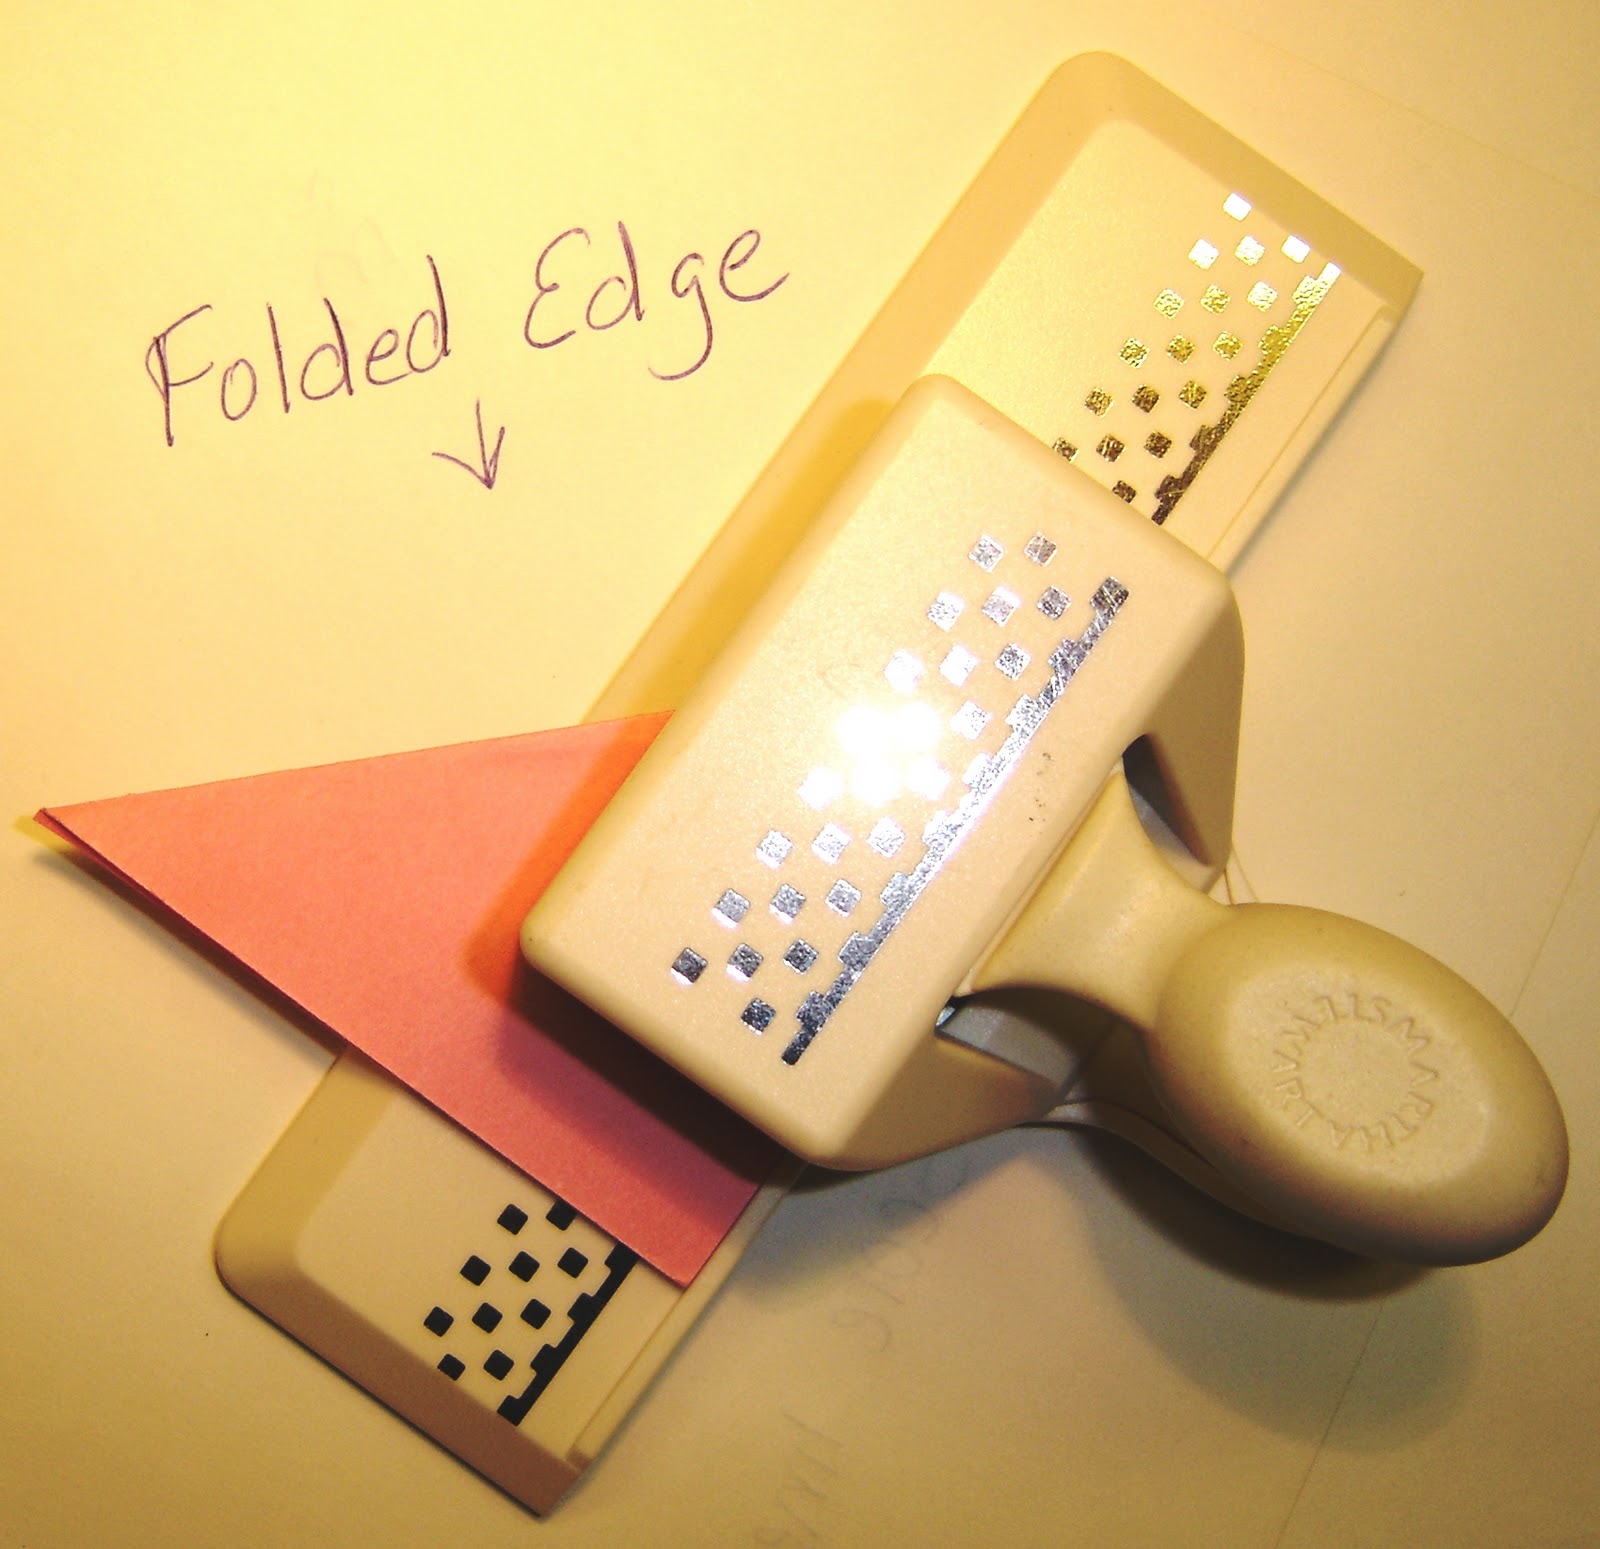
Step 3 – Place in border punch, with scored fold away from punch, I looked at the bottom of the punch and lined the point over at the far edge and punched. (Heavy weight cardstock may not work doubled in the punch.)
Step 4 – Turn the piece around and punch other side the same way.

Step 5 – Fold and line up holes in opposite diagonal direction, you can  score it, but the holes may not line up. Lineup holes with the diagram on the edge of the punch, making sure it is far enough into the punch to complete the row.
(I forgot to take a picture)
Step 6 – Turn the piece around and punch other side the same way.

Step 7 – Completed frame.

**Make both folds in the same direction, place the scored side away from you, the folds don’t show up so bad.**

Since I invented something, (at least I think I did) I wanted to show it off in a card. My brain went dead, what to do… what to do??? I needed an image that would fit and I needed some kind of layout. I used the sketch challenge over at Stamp TV, and will be entering this one in the Use It Tuesday challenge, since this is the first time I have used these two stamps, I just joined Paper Craft Planet, I’ll have to figure out how to post it there also, not to mention SCS.


Ok, card details……the image and sentiment is from a Clear Dollar Stamps set called Get Well Critters. I stamped the mouse on white cardstock with onyx black versafine, colored with prismacolored pencils and goo gone, dotted the eye with a black glaze pen, punched it out with a square punch, layered onto green cardstock, then on the pink frame. The dp is from my scrap pile, cut to match the Stamp TV sketch challenge, layered on white cardstock, with a pink base card. The sentiment was stamped in onyx black versafine onto a piece of pink cardstock cut out with a Cuttlebug Slider Die, with a ribbon run through it. Thanks for stopping by, I hope you enjoyed my redneck tutorial and I’d love to hear your comments.

Sunday, February 6, 2011

Mini Cabin

Here is another card for the Clearly Inspired Challenge for February at Clear Dollar Stamps, find out more about it here.

For this card I chose the CDS set Mini Silhouette Scapes (another unused set) and the sentiment is from a CDS set Terrific Little Tree.

In trying to figure out how to work this I first cut the small oval with a Quick Kutz die called Nameplates, with white cardstock, I had already decided to use the blue checked dp, the dark blue paper and vinyl ribbon, but hadn’t decided what else to use with it. Next, the moon was stamped with versamark and I embossed with clear detail ep, then the tree line was added, by stamping with versamark and embossing with detail black ep, then the cabin was added the same way. Next I chose to add some clouds by the moon, they were also stamped with versamark but this time I used detail white ep. The sky was sponged with stormy sky distress ink, and for the ground a combination of old paper and pumice stone distress inks.  By this time, I had a decision to make on my layering color, it was a toss up of white and beige. I cut my second oval with the nameplate die in white, then decided to layer the other with beige. I had a hard time picking out something to go with the rest, finally I settled on the dp  with the twinkling stars, added three beige brads, stamped the sentiment with onyx black versafine and punched with a SU small oval punch. I think it turned out kind of blah, I guess it was my color choices. Thanks for stopping by, and would love to hear your comments.

Friday, February 4, 2011

Shoe Fly

Here is my second card today for the Clear Dollar Stamps February challenge,
find out more about it here.

I chose another unused CDS set called Shoe Fly. The main image was stamped on white cardstock, with versamark ink and embossed with detail black ep, the body parts of the fly was colored with metallic gel pens and a watercolor brush, the wings with a clear glitter pen. The mushroom, boots, what I am assuming is a sleeping bag, bedroll and map was colored with prismacolored pencils and goo gone. I made a mask and stippled wild honey distress all over the white, then cut and embossed with a nesties circle die. I added crackle accents to the glittered wings, and since I didn’t have any googly eyes the right size, I sort of made my own, they don’t move though. I used a hole punch (I think it’s 1/8”) and punched two holes in a scrap piece of black cardstock, picked up the punched pieces and glued them in place, waited a couple minutes for the glue to dry, then covered the area with crystal lacquer, I then laid this piece way off to the side, cause I generally wind up laying something on top of or dropping something on pieces I am waiting to dry. I had already picked out my dp from my scrap pile, I had to decide on what colors to go with it, so I decided on a yellowish orange color for the card base, and brown for layering. I cut the brown with the scalloped circle nestie, then cut the brown for the layer behind the polka dot dp. I forgot to pick another color so the brown kind of went on top of brown, so I punched the corners of the polka dot dp and the brown layer for that dp with a corner punch (I don’t remember what it is called). The top right corner striped dp was paper piereced the bottom left corner of the striped dp has three green eyelets. The ribbon is orange with white polka dots. The brown scalloped circle is paper pierced on each scallop, and for the image circle paper piercing I used one of those round plastic canvas thingys for the template to pierce, the holes are more square or rectangle instead of round, but I stuck my piercing tool in the top left part of the hole and worked my way around, placing the piercing tool in the same location for each hole, and I avoided piercing the image. The sentiment is from the same stamp set, stamped with onyx black versafine on the yellowish orange paper, and punched out with a SU window punch. Thought I'd add a closeup of the eyes and wings.

Thanks for stopping by and I’d love to hear your comments.

Nestled Love

Clear Dollar Stamps has a new challenge for this month,

you can view all the details here.

For the sketch, I chose an unused CDS set called Nestled Love and did my own version of the black magic technique.

The main image was stamped on black with versamark ink, embossed with detail white, colored with prisma colored pencils, then cut out and embossed with nesties ovals. For the image layer, I only ran the clear glitter gel pen around the top part of the oval. The rust colored layer was also cut out with a nestie oval, and after the image layer was attached, I used a white gel pen to outline it, all the way around. The ribbon is something I picked up at a yard sale, it’s rather fancy, it reminds me of a wedding dress. I don’t know if you will be able to see it very good in the picture, but it has some sparkle to it. The dp is out of my scrap bin, I have been trying to use scraps up, before getting anymore new stuff out. The layering for the dp is the same rust color as the layer for the image and the base card. The layer between the base card and the little star dp is black. I used a cuttlebug tiny tag die to cut out the tag for the sentiment, and three rust colored snaps to finish it off. Thanks for looking, and would love to hear your comments.