Tuesday, February 8, 2011

Faux Pressed Flowers

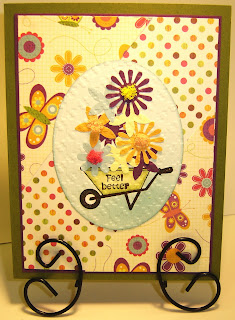
This card is for two different challenges, see this week’s sketch challenge at Stamp TV here, and this week's challenge at Use It Tuesdays here.


I decided to try the Faux Pressed Flowers technique for my card. The wheelbarrow and sentiment is from a GKD set Funny Farm, stamped on white cardstock with onyx black versafine, then colored with prismacolored pencils and goo gone, for the handle and leg SU markers were used. Tumbled glass distress ink was stippled all over the white, and sponged around the edge of the oval after it was cut out with an oval nestie. The flowers were punched out with a SU flower punch from some scrap paper in some matching colors to the dp, glued in place and then run through the cuttlebug with a houndstooth ef. The dp is from my scrap pile, layered onto purple with a green card base. After the card was put together, I dabbed glue on some of the flower centers and added Flowersoft from the pastel and rainbow sets. Thanks for looking and I would love to hear your comments.

Monday, February 7, 2011

Hogs & Kisses

This week’s color challenge at Stamp TV is to use onyx black, bubblegum pink and sweet mango. I used the GKD set Funny Farm for this card.

The black fence was made with a MS border punch. For the mud puddle under the hog I used a versamark pen with detail clear ep, under the farmer is just plain versamark. The hogs were stamped on pink paper and cut out. The farmer was stamped on the mango paper, and on white. I colored the white with prismacolored pencils and goo gone, and then cut it out. I stamped the boots two more times, for one layer the whole boot colored and cut out and glued to the white image, then I just cut the toe part out of the other set and attached to the other layers. Thanks for looking and would love to hear your comments.

Sunday, February 6, 2011

Mini Cabin

Here is another card for the Clearly Inspired Challenge for February at Clear Dollar Stamps, find out more about it here.

For this card I chose the CDS set Mini Silhouette Scapes (another unused set) and the sentiment is from a CDS set Terrific Little Tree.

In trying to figure out how to work this I first cut the small oval with a Quick Kutz die called Nameplates, with white cardstock, I had already decided to use the blue checked dp, the dark blue paper and vinyl ribbon, but hadn’t decided what else to use with it. Next, the moon was stamped with versamark and I embossed with clear detail ep, then the tree line was added, by stamping with versamark and embossing with detail black ep, then the cabin was added the same way. Next I chose to add some clouds by the moon, they were also stamped with versamark but this time I used detail white ep. The sky was sponged with stormy sky distress ink, and for the ground a combination of old paper and pumice stone distress inks.  By this time, I had a decision to make on my layering color, it was a toss up of white and beige. I cut my second oval with the nameplate die in white, then decided to layer the other with beige. I had a hard time picking out something to go with the rest, finally I settled on the dp  with the twinkling stars, added three beige brads, stamped the sentiment with onyx black versafine and punched with a SU small oval punch. I think it turned out kind of blah, I guess it was my color choices. Thanks for stopping by, and would love to hear your comments.

Friday, February 4, 2011

Shoe Fly

Here is my second card today for the Clear Dollar Stamps February challenge,
find out more about it here.

I chose another unused CDS set called Shoe Fly. The main image was stamped on white cardstock, with versamark ink and embossed with detail black ep, the body parts of the fly was colored with metallic gel pens and a watercolor brush, the wings with a clear glitter pen. The mushroom, boots, what I am assuming is a sleeping bag, bedroll and map was colored with prismacolored pencils and goo gone. I made a mask and stippled wild honey distress all over the white, then cut and embossed with a nesties circle die. I added crackle accents to the glittered wings, and since I didn’t have any googly eyes the right size, I sort of made my own, they don’t move though. I used a hole punch (I think it’s 1/8”) and punched two holes in a scrap piece of black cardstock, picked up the punched pieces and glued them in place, waited a couple minutes for the glue to dry, then covered the area with crystal lacquer, I then laid this piece way off to the side, cause I generally wind up laying something on top of or dropping something on pieces I am waiting to dry. I had already picked out my dp from my scrap pile, I had to decide on what colors to go with it, so I decided on a yellowish orange color for the card base, and brown for layering. I cut the brown with the scalloped circle nestie, then cut the brown for the layer behind the polka dot dp. I forgot to pick another color so the brown kind of went on top of brown, so I punched the corners of the polka dot dp and the brown layer for that dp with a corner punch (I don’t remember what it is called). The top right corner striped dp was paper piereced the bottom left corner of the striped dp has three green eyelets. The ribbon is orange with white polka dots. The brown scalloped circle is paper pierced on each scallop, and for the image circle paper piercing I used one of those round plastic canvas thingys for the template to pierce, the holes are more square or rectangle instead of round, but I stuck my piercing tool in the top left part of the hole and worked my way around, placing the piercing tool in the same location for each hole, and I avoided piercing the image. The sentiment is from the same stamp set, stamped with onyx black versafine on the yellowish orange paper, and punched out with a SU window punch. Thought I'd add a closeup of the eyes and wings.

Thanks for stopping by and I’d love to hear your comments.
Nestled Love

Clear Dollar Stamps has a new challenge for this month,

you can view all the details here.

For the sketch, I chose an unused CDS set called Nestled Love and did my own version of the black magic technique.

The main image was stamped on black with versamark ink, embossed with detail white, colored with prisma colored pencils, then cut out and embossed with nesties ovals. For the image layer, I only ran the clear glitter gel pen around the top part of the oval. The rust colored layer was also cut out with a nestie oval, and after the image layer was attached, I used a white gel pen to outline it, all the way around. The ribbon is something I picked up at a yard sale, it’s rather fancy, it reminds me of a wedding dress. I don’t know if you will be able to see it very good in the picture, but it has some sparkle to it. The dp is out of my scrap bin, I have been trying to use scraps up, before getting anymore new stuff out. The layering for the dp is the same rust color as the layer for the image and the base card. The layer between the base card and the little star dp is black. I used a cuttlebug tiny tag die to cut out the tag for the sentiment, and three rust colored snaps to finish it off. Thanks for looking, and would love to hear your comments.